Instantiate Specific Browser Or Client
You may need this code in every selenium script. So I thought of keeping it here handy for the popular ones.Firefox Driver
WebDriver driver = new FirefoxDriver();Chrome Driver
WebDriver driver = new ChromeDriver();Safari Driver
WebDriver driver = new SafariDriver();Internet Explorer Driver
WebDriver driver = new InternetExplorerDriver();
Android Driver
WebDriver driver = new AndroidDriver()iPhone Driver
WebDriver driver = new IPhoneDriver();HTML Unit
WebDriver driver = new HtmlUnitDriver()
Check If An Element Exists
You may need to perform a action based on a specific web element being present on the web page. You can use below code snippet to check if a element with id “element-id” exists on web page.driver.findElements(By.id("element-id")).size()!=0
How To Check If An Element Is Visible With WebDriver
The above mentioned method may be good to check if a elemet exists on page. However sometimes a element may be not visible, therefore you can not perform any action on it. You can check whether an element is visible or not using below code.WebElement element = driver.findElement(By.id("element-id"));
if(element instanceof RenderedWebElement) {
System.out.println("Element visible");
} else {
System.out.println("Element Not visible");
}
Refresh Page
This may be required often. Just a simple refresh of the page equivalent to a browser refresh.driver.navigate().refresh();
Navigate Back And Forward On The Browser
Navigating the history of borwser can be easily done using below two methods. The names are self explanatory.//Go back to the last visited page driver.navigate().back(); //go forward to the next page driver.navigate().forward();
Wait For Element To Be Available
The application may load some elements late and your script needs to stop for the element to be available for next action. You can perform this check using below code.In below code, the script is going to wait maximum 30 seconds for the element to be available. Feel free to change the maximum number per your application needs.
WebDriverWait wait = new WebDriverWait(driver, 30);
WebElement element = wait.until(ExpectedConditions.elementToBeClickable(By.id("id123")));
Focus On A Input Element On Page
Doing focus on any element can be easily done by clicking the mouse on the required element. However when you are using selenium you may need to use this workaround instead of mouse click you can send some empty keys to a element you want to focus.WebElement element = driver.findElement(By.id("element-id"));
//Send empty message to element for setting focus on it.
element.sendKeys("");
Overwrite Current Input Value On Page
The sendKeys method on WebElement class will append the value to existing value of element. If you want to clear the old value. You can use clear() method.WebElement element = driver.findElement(By.id("element-id"));
element.clear();
element.sendKeys("new input value");
Mouseover Action To Make Element Visible Then Click
When you are dealing with highly interactive multi layered menu on a page you may find this useful. In this scenario, an element is not visible unless you click on the menu bar. So below code snippet will accomplish two steps of opening a menu and selecting a menu item easily.Actions actions = new Actions(driver);
WebElement menuElement = driver.findElement(By.id("menu-element-id"));
actions.moveToElement(menuElement).moveToElement(driver.findElement(By.xpath("xpath-of-menu-item-element"))).click();
Extract CSS Attribute Of An Element
This can be really helpful for getting any CSS property of a web element.For example, to get background color of an element use below snippet
String bgcolor = driver.findElement(By.id("id123")).getCssValue("background-color");
and to get text color of an element use below snippet
String textColor = driver.findElement(By.id("id123")).getCssValue("color");
Find All Links On The Page
A simple way to extract all links from a web page.Listlink = driver.findElements(By.tagName("a"));
Take A Screenshot On The Page
The most useful one. Selenium can capture the screenshot of any error you want to record. You may want to add this code in your exception handling logic.File snapshot =((TakesScreenshot)driver).getScreenshotAs(OutputType.FILE);
Execute A JavaScript Statement On Page
If you love JavaScript, you are going to love this. This simple JavascriptExecutor can run any javascript code snippet on browser during your testing. In case you are not able to find a way to do something using web driver, you can do that using JS easily.Below code snippet demonstrates how you can run a alert statement on the page you are testing.
JavascriptExecutor jsx = (JavascriptExecutor) driver;
jsx.executeScript("alert('hi')");
Upload A File On A Page
Uploading a file is a common use case. As of now there is not webdriver way to do this, however this can be easily done with the help of JavascriptExecutor and little bit of JS code.String filePath = "path\\to\\file\for\\upload";
JavascriptExecutor jsx = (JavascriptExecutor) driver;
jsx.executeScript("document.getElementById('fileName').value='" + filePath + "';");
Scroll Up, Down Or Anywhere On A Page
Scrolling on any web page is required almost always. You may use below snippets to do scrolling in any direction you need.JavascriptExecutor jsx = (JavascriptExecutor) driver;
//Vertical scroll - down by 100 pixels
jsx.executeScript("window.scrollBy(0,100)", "");
//Vertical scroll - up by 55 pixels (note the number is minus 55)
jsx.executeScript("window.scrollBy(0,-55)", "");
//Horizontal scroll - right by 20 pixels
jsx.executeScript("window.scrollBy(20,0)", "");
//Horizontal scroll - left by 95 pixels (note the number is minus 95)
jsx.executeScript("window.scrollBy(-95,0)", "");
Get HTML Source Of A Element On Page
If you want to extract the HTML source of any element, you can do this by some simple Javascript code.JavascriptExecutor jsx = (JavascriptExecutor) driver;
String elementId = "element-id";
String html =(String) jsx.executeScript("return document.getElementById('" + elementId + "').innerHTML;");
Switch Between Frames In Java Using Webdriver
Multiple iframes are very common in recent web applications. You can have your webdriver script switch between different iframes easily by below code sampleWebElement frameElement = driver.findElement(By.id("id-of-frame"));
driver.switchTo().frame(frameElement);=============
Monday, March 15, 2021
3:26 PM
public static void main(String[] args) {
// declaration and instantiation of objects/variables
System.setProperty("webdriver.gecko.driver","C:\\geckodriver.exe");
WebDriver driver = new FirefoxDriver();
//comment the above 2 lines and uncomment below 2 lines to use Chrome
//System.setProperty("webdriver.chrome.driver","G:\\chromedriver.exe");
//WebDriver driver = new ChromeDriver();
String baseUrl = "http://demo.guru99.com/test/newtours/";
String expectedTitle = "Welcome: Mercury Tours";
String actualTitle = "";// launch Fire fox and direct it to the Base URL
driver.get(baseUrl);// get the actual value of the title
actualTitle = driver.getTitle();/*
* compare the actual title of the page with the expected one and print
* the result as "Passed" or "Failed"
*/
if (actualTitle.contentEquals(expectedTitle)){
System.out.println("Test Passed!");
} else {
System.out.println("Test Failed");
}
//close Fire fox
driver.close();
}}
From <https://www.guru99.com/first-webdriver-script.html>
Monday, March 15, 2021
3:30 PM
Locating GUI Elements
Locating elements in WebDriver is done by using the "findElement(By.locator())" method. The "locator" part of the code is same as any of the locators previously discussed in the Selenium IDE chapters of these tutorials. Infact, it is recommended that you locate GUI elements using IDE and once successfully identified export the code to WebDriver.
Here is a Selenium sample code that locates an element by its id. Facebook is used as the Base URL.
package newproject;
import org.openqa.selenium.By;
import org.openqa.selenium.WebDriver;
import org.openqa.selenium.firefox.FirefoxDriver;public class PG2 {
public static void main(String[] args) {
System.setProperty("webdriver.gecko.driver","C:\\geckodriver.exe");
WebDriver driver = new FirefoxDriver();
String baseUrl = "http://www.facebook.com";
String tagName = "";
driver.get(baseUrl);
tagName = driver.findElement(By.id("email")).getTagName();
System.out.println(tagName);
driver.close();
System.exit(0);
}
}
From <https://www.guru99.com/first-webdriver-script.html>
Monday, March 15, 2021
3:31 PM
Summary for locating elements
|
Variation |
Description |
Sample |
|
By.className |
finds
elements based on the value of the "class" attribute |
findElement(By.className("someClassName")) |
|
By.cssSelector |
finds
elements based on the driver's underlying CSS Selector engine |
findElement(By.cssSelector("input#email")) |
|
By.id |
locates
elements by the value of their "id" attribute |
findElement(By.id("someId")) |
|
By.linkText |
finds
a link element by the exact text it displays |
findElement(By.linkText("REGISTRATION")) |
|
By.name |
locates
elements by the value of the "name" attribute |
findElement(By.name("someName")) |
|
By.partialLinkText |
locates
elements that contain the given link text |
findElement(By.partialLinkText("REG")) |
|
By.tagName |
locates
elements by their tag name |
findElement(By.tagName("div")) |
|
By.xpath |
locates
elements via XPath |
findElement(By.xpath("//html/body/div/table/tbody/tr/td[2]/table/ tbody/tr[4]/td/table/tbody/tr/td[2]/table/tbody/tr[2]/td[3]/
form/table/tbody/tr[5]")) |
From <https://www.guru99.com/first-webdriver-script.html>
Css selector contains
Monday, March 15, 2021
3:32 PM
Note
on Using findElement(By.cssSelector())
By.cssSelector()
does not support the "contains" feature.
Consider the Selenium IDE code below -
.png)
In
Selenium IDE above, the entire test passed. However in the Selenium WebDriver
script below, the same test generated an error because WebDriver does not
support the "contains" keyword when used in the By.cssSelector()
method.
From <https://www.guru99.com/first-webdriver-script.html>
Monday, March 15, 2021
3:33 PM
Instantiating
Web Elements
Instead
of using the long "driver.findElement(By.locator())" syntax every
time you will access a particular element, we can instantiate a WebElement
object for it. The WebElement class is contained in the
"org.openqa.selenium.*" package.
.png)
From <https://www.guru99.com/first-webdriver-script.html>
Monday, March 15, 2021
3:33 PM
Clicking
on an Element
Clicking
is perhaps the most common way of interacting with web elements. The click()
method is used to simulate the clicking of any element. The
following Selenium Java example shows how click() was used to click on Mercury
Tours' "Sign-In" button.
![]()
Following
things must be noted when using the click() method.
- It does not take any parameter/argument.
- The method automatically waits for a new page to
load if applicable.
- The element to be clicked-on, must be visible (height
and width must not be equal to zero).
From <https://www.guru99.com/first-webdriver-script.html>
Monday, March 15, 2021
3:34 PM
Get
Commands
Get
commands fetch various important information about the page/element. Here are
some important "get" commands you must be familiar with.
|
Commands |
Usage |
|
get() Sample
usage: |
|
|
getTitle() Sample
usage: |
|
|
getPageSource() Sample
usage: |
|
|
getCurrentUrl() Sample
usage: |
|
|
getText() Sample
usage: |
|
From <https://www.guru99.com/first-webdriver-script.html>
Monday, March 15, 2021
3:34 PM
Navigate
commands
These
commands allow you to refresh,go-into and switch back and forth between
different web pages.
|
navigate().to() Sample
usage: |
|
|
navigate().refresh() Sample
usage: |
|
|
navigate().back() Sample
usage: |
|
|
navigate().forward() Sample
usage: |
|
From <https://www.guru99.com/first-webdriver-script.html>
Monday, March 15, 2021
3:35 PM
Closing
and Quitting Browser Windows
|
close() Sample
usage: |
|
|
quit() Sample
usage: |
|
From <https://www.guru99.com/first-webdriver-script.html>
Notice
that only the parent browser window was closed and not the two pop-up windows.

But
if you use quit(), all windows will be closed - not just the parent one. Try
running the code below and you will notice that the two pop-ups above will
automatically be closed as well.
From <https://www.guru99.com/first-webdriver-script.html>
Monday, March 15, 2021
3:37 PM
Switching
Between Frames
To
access GUI elements in a Frame, we should first direct WebDriver to focus on
the frame or pop-up window first before we can access elements within them. Let
us take, for example, the web page http://demo.guru99.com/selenium/deprecated.html
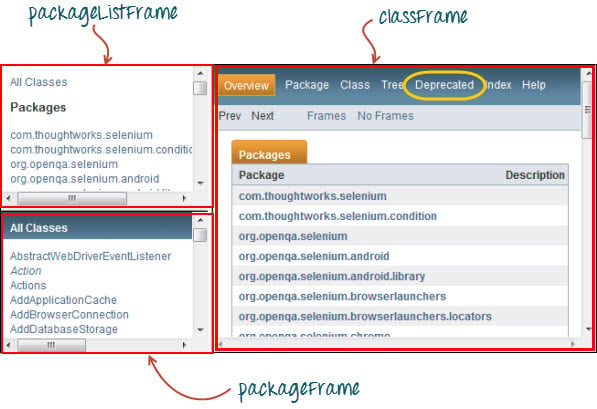
This
page has 3 frames whose "name" attributes are indicated above. We wish
to access the "Deprecated" link encircled above in yellow. In order
to do that, we must first instruct WebDriver to switch to the
"classFrame" frame using the "switchTo().frame()" method.
We will use the name attribute of the frame as the parameter for the
"frame()" part.
package
newproject;
import org.openqa.selenium.By;
import org.openqa.selenium.WebDriver;
import org.openqa.selenium.firefox.FirefoxDriver;
public class PG4 {
public static void main(String[] args) {
System.setProperty("webdriver.gecko.driver","C:\\geckodriver.exe");
WebDriver driver = new
FirefoxDriver();
driver.get("http://demo.guru99.com/selenium/deprecated.html");
driver.switchTo().frame("classFrame");
driver.findElement(By.linkText("Deprecated")).click();
driver.close();
}
}
From <https://www.guru99.com/first-webdriver-script.html>
Monday, March 15, 2021
3:38 PM
Switching
Between Pop-up Windows
WebDriver
allows pop-up windows like alerts to be displayed, unlike in Selenium IDE. To
access the elements within the alert (such as the message it contains), we must
use the "switchTo().alert()" method. In the code
below, we will use this method to access the alert box and then retrieve its
message using the "getText()" method, and then
automatically close the alert box using the "switchTo().alert().accept()" method.
First,
head over to http://jsbin.com/usidix/1 and manually click the
"Go!" button there and see for yourself the message text.
.png)
Lets
see the Selenium example code to do this-
package
mypackage;
import
org.openqa.selenium.By;
import org.openqa.selenium.WebDriver;
import org.openqa.selenium.firefox.FirefoxDriver;
public class
myclass {
public static
void main(String[] args) {
System.setProperty("webdriver.gecko.driver","C:\\geckodriver.exe");
WebDriver driver = new
FirefoxDriver();
String alertMessage =
"";
driver.get("http://jsbin.com/usidix/1");
driver.findElement(By.cssSelector("input[value=\"Go!\"]")).click();
alertMessage =
driver.switchTo().alert().getText();
driver.switchTo().alert().accept();
System.out.println(alertMessage);
driver.quit();
}
}
From <https://www.guru99.com/first-webdriver-script.html>
Waits
Monday, March 15, 2021
3:39 PM
Waits
There
are two kinds of waits.
1.
Implicit wait - used to set the default waiting
time throughout the program
2.
Explicit wait - used to set the waiting time
for a particular instance only
Implicit
Wait
- It is simpler to code than Explicit Waits.
- It is usually declared in the instantiation part of the
code.
- You will only need one additional package to import.
To
start using an implicit wait, you would have to import this package into your
code.
![]()
Then
on the instantiation part of your code, add this.
.png)
Explicit
Wait
Explicit
waits are done using the WebDriverWait and ExpectedCondition classes.
For the following Selenium WebDriver example, we shall wait up to 10 seconds
for an element whose id is "username" to become visible before
proceeding to the next command. Here are the steps.
Step
1
Import
these two packages:
![]()
Step
2
Declare
a WebDriverWait variable. In this example, we will use "myWaitVar" as
the name of the variable.
.png)
Step
3
Use
myWaitVar with ExpectedConditions on portions where you need the explicit wait
to occur. In this case, we will use explicit wait on the "username"
(Mercury Tours HomePage) input before we type the text "tutorial"
onto it.
![]()
From <https://www.guru99.com/first-webdriver-script.html>
Monday, March 15, 2021
3:40 PM
Conditions
Following
methods are used in conditional and looping operations --
- isEnabled() is used when you want
to verify whether a certain element is enabled or not before executing a
command.
.png)
- isDisplayed() is used when you want
to verify whether a certain element is displayed or not before executing a
command.
.png)
- isSelected() is used when you want
to verify whether a certain check box, radio button, or option in
a drop-down box is selected. It does not work on other elements.

From <https://www.guru99.com/first-webdriver-script.html>
Monday, March 15, 2021
3:40 PM
Using
ExpectedConditions
The
ExpectedConditions class offers a wider set of conditions that you can use in
conjunction with WebDriverWait's until() method.
Below
are some of the most common ExpectedConditions methods.
- alertIsPresent() - waits
until an alert box is displayed.
.png)
- elementToBeClickable() -
Waits until an element is visible and, at the same time, enabled. The sample
Selenium Code below will wait until the element with
id="username" to become visible and enabled first before
assigning that element as a WebElement variable named
"txtUserName".
![]()
- frameToBeAvailableAndSwitchToIt() - Waits until the given frame is already available, and
then automatically switches to it.
.png)
From <https://www.guru99.com/first-webdriver-script.html>
Monday, March 15, 2021
3:41 PM
Catching
Exceptions
When
using isEnabled(), isDisplayed(), and isSelected(), WebDriver assumes that the
element already exists on the page. Otherwise, it will throw a NoSuchElementException.
To avoid this, we should use a try-catch block so that the program will not be
interrupted.
WebElement
txtbox_username = driver.findElement(By.id("username"));
try{
if(txtbox_username.isEnabled()){
txtbox_username.sendKeys("tutorial");
}
}
catch(NoSuchElementException
nsee){
System.out.println(nsee.toString());
}
If
you use explicit waits, the type of exception that you should catch is the
"TimeoutException".
.png)
From <https://www.guru99.com/first-webdriver-script.html>
Monday, March 15, 2021
3:49 PM
CSS
Selectors in Selenium are string patterns used to identify an element based on
a combination of HTML tag, id, class, and attributes. Locating by CSS Selectors
in Selenium is more complicated than the previous methods, but it is the most
common locating strategy of advanced Selenium users because it can access even
those elements that have no ID or name.
CSS
Selectors in Selenium have many formats, but we will only focus on the most
common ones.
- Tag and ID
- Tag and class
- Tag and attribute
- Tag, class, and attribute
- Inner text
When
using this strategy, we always prefix the Target box with "css=" as
will be shown in the following examples.
Locating
by CSS Selector - Tag and ID
Again,
we will use Facebook's Email text box in this example. As you can remember, it
has an ID of "email," and we have already accessed it in the
"Locating by ID" section. This time, we will use a Selenium CSS
Selector with ID in accessing that very same element.
|
Syntax |
Description |
|
css=tag#id |
|
Keep
in mind that the ID is always preceded by a hash sign (#).
Step
1. Navigate to www.facebook.com. Using Firebug, examine the "Email
or Phone" text box.
At
this point, take note that the HTML tag is "input" and its ID is
"email". So our syntax will be "css=input#email".

Step
2. Enter "css=input#email" into the
Target box of Selenium IDE and click the Find button. Selenium IDE should be
able to highlight that element.

Locating
by CSS Selector - Tag and Class
Locating
by CSS Selector in Selenium using an HTML tag and a class name is similar to
using a tag and ID, but in this case, a dot (.) is used instead of a hash sign.
|
Syntax |
Description |
|
css=tag.class |
|
Step
1. Go to the demo page http://demo.guru99.com/test/facebook.html and use Firebug to inspect the
"Email or Phone" text box. Notice that its HTML tag is
"input" and its class is "inputtext."

Step
2. In Selenium IDE, enter
"css=input.inputtext" in the Target box and click Find. Selenium IDE
should be able to recognize the Email or Phone text box.
Take
note that when multiple elements have the same HTML tag and name, only the
first element in source code will be recognized.
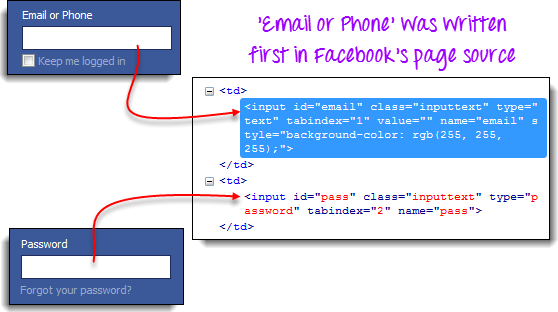
Using Firebug, inspect the Password text box in Facebook and notice that it has
the same name as the Email or Phone text box.

The
reason why only the Email or Phone text box was highlighted in the previous
illustration is that it comes first in Facebook's page source.
Locating
by CSS Selector - Tag and Attribute
This
strategy uses the HTML tag and a specific attribute of the element to be
accessed.
|
Syntax |
Description |
|
css=tag[attribute=value] |
|
Step
1. Navigate to Mercury Tours' Registration
page (http://demo.guru99.com/test/newtours/register.php) and inspect the "Last Name"
text box. Take note of its HTML tag ("input" in this case) and its
name ("lastName").

Step
2. In Selenium IDE, enter
"css=input[name=lastName]" in the Target box and click Find. Selenium
IDE should be able to access the Last Name box successfully.

When
multiple elements have the same HTML tag and attribute, only the first one will
be recognized. This behavior is similar to locating elements
using CSS selectors with the same tag and class.
Locating
by CSS Selector - tag, class, and attribute
|
Syntax |
Description |
|
css=tag.class[attribute=value] |
|
Step
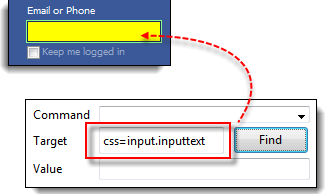
1. Go to the demo page http://demo.guru99.com/test/facebook.html and use Firebug to inspect the 'Email
or Phone' and 'Password' input boxes. Take note of their HTML tag, class, and
attributes. For this example, we will select their 'tabindex' attributes.

Step
2. We will access the 'Email or Phone'
text box first. Thus, we will use a tabindex value of 1. Enter
"css=input.inputtext[tabindex=1]" in Selenium IDE's Target box and
click Find. The 'Email or Phone' input box should be highlighted.

Step
3. To access the Password input box, simply
replace the value of the tabindex attribute. Enter
"css=input.inputtext[tabindex=2]" in the Target box and click on the
Find button. Selenium IDE must be able to identify the Password text box
successfully.

Locating
by CSS Selector - inner text
As
you may have noticed, HTML labels are seldom given id, name, or class
attributes. So, how do we access them? The answer is through the use of their
inner texts. Inner texts are the actual string patterns that the HTML
label shows on the page.
|
Syntax |
Description |
|
css=tag:contains("inner text") |
|
Step
1. Navigate to Mercury Tours' homepage (http://demo.guru99.com/test/newtours/) and use Firebug to investigate the
"Password" label. Take note of its HTML tag (which is
"font" in this case) and notice that it has no class, id, or name
attributes.

Step
2. Type css=font:contains("Password:") into
Selenium IDE's Target box and click Find. Selenium IDE should be able to access
the Password label as shown in the image below.

Step
3. This time, replace the inner text with
"Boston" so that your Target will now become
"css=font:contains("Boston")". Click Find. You should
notice that the "Boston to San Francisco" label becomes highlighted.
This shows you that Selenium IDE can access a long label even if you just
indicated the first word of its inner text.

Locating
by DOM (Document Object Model)
The
Document Object Model (DOM), in simple terms, is the way by which HTML elements
are structured. Selenium IDE is able to use the DOM in accessing page elements.
If we use this method, our Target box will always start with
"dom=document..."; however, the "dom=" prefix is normally
removed because Selenium IDE is able to automatically interpret anything that
starts with the keyword "document" to be a path within the DOM in
Selenium anyway.
There
are four basic ways to locate an element through DOM in Selenium:
- getElementById
- getElementsByName
- dom:name (applies only to elements within a named form)
- dom:index
Locating
by DOM - getElementById
Let
us focus on the first method - using the getElementById method of DOM in
Selenium. The syntax would be:
|
Syntax |
Description |
|
document.getElementById("id of the element") |
id of
the element = this is the value of the ID attribute of the element to be accessed.
This value should always be enclosed in a pair of parentheses (""). |
Step
1. Use this demo page http://demo.guru99.com/test/facebook.html Navigate to it and use Firebug to
inspect the "Keep me logged in" check box. Take note of its ID.

We
can see that the ID we should use is "persist_box".
Step
2. Open Selenium IDE and in the Target box,
enter "document.getElementById("persist_box")" and click
Find. Selenium IDE should be able to locate the "Keep me logged in"
check box. Though it cannot highlight the interior of the check box, Selenium
IDE can still surround the element with a bright green border as shown below.

Locating
by DOM - getElementsByName
The
getElementById method can access only one element at a time, and that is the
element with the ID that you specified. The getElementsByName method is
different. It collects an array of elements that have the name that you
specified. You access the individual elements using an index which starts at 0.
|
|
getElementById
|
|
|
|
|
getElementsByName
|


|
Syntax |
Description |
|
document.getElementsByName("name")[index] |
|
Step
1. Navigate to Mercury Tours' Homepage and
login using "tutorial" as the username and password. Firefox should
take you to the Flight Finder screen.
Step
2. Using Firebug, inspect the three radio
buttons at the bottom portion of the page (Economy class, Business class, and
First class radio buttons). Notice that they all have the same name which is
"servClass".

Step
3. Let us access the "Economy
class" radio button first. Of all these three radio buttons, this element
comes first, so it has an index of 0. In Selenium IDE, type
"document.getElementsByName("servClass")[0]" and click the
Find button. Selenium IDE should be able to identify the Economy class radio
button correctly.

Step
4. Change the index number to 1 so that your
Target will now become document.getElementsByName("servClass")[1].
Click the Find button, and Selenium IDE should be able to highlight the
"Business class" radio button, as shown below.

Locating
by DOM - dom:name
As
mentioned earlier, this method will only apply if the element you are accessing
is contained within a named form.
|
Syntax |
Description |
|
document.forms["name
of the form"].elements["name of the element"] |
|
Step
1. Navigate to Mercury Tours homepage (http://demo.guru99.com/test/newtours/) and use Firebug to inspect the User
Name text box. Notice that it is contained in a form named "home."

Step
2. In Selenium IDE, type
"document.forms["home"].elements["userName"]" and
click the Find button. Selenium IDE must be able to access the element
successfully.

Locating
by DOM - dom:index
This
method applies even when the element is not within a named form because it uses
the form's index and not its name.
|
Syntax |
Description |
|
document.forms[index
of the form].elements[index of the element] |
|
We
shall access the "Phone" text box within Mercury Tours Registration
page. The form in that page has no name and ID attribute, so this will make a
good example.
Step
1. Navigate to Mercury Tours Registration
page and inspect the Phone text box. Notice that the form containing it has no
ID and name attributes.

Step
2. Enter "document.forms[0].elements[3]"
in Selenium IDE's Target box and click the Find button. Selenium IDE should be
able to access the Phone text box correctly.

Step
3. Alternatively, you can use the element's
name instead of its index and obtain the same result. Enter
"document.forms[0].elements["phone"]" in Selenium IDE's
Target box. The Phone text box should still become highlighted.

Locating
by XPath
XPath
is the language used when locating XML (Extensible Markup Language) nodes.
Since HTML can be thought of as an implementation of XML, we can also use XPath in locating HTML elements.
Advantage: It
can access almost any element, even those without class, name, or id
attributes.
Disadvantage: It
is the most complicated method of identifying elements because of too many
different rules and considerations.
Fortunately,
Firebug can automatically generate XPath Selenium locators. In the following
example, we will access an image that cannot possibly be accessed through the
methods we discussed earlier.
Step
1. Navigate to Mercury Tours Homepage and
use Firebug to inspect the orange rectangle to the right of the yellow
"Links" box. Refer to the image below.

Step
2. Right click on the element's HTML code and
then select the "Copy XPath" option.

Step
3. In Selenium IDE, type one forward slash
"/" in the Target box then paste the XPath that we copied in the
previous step. The entry in your Target box should now begin with two
forward slashes "//".

Step
4. Click on the Find button. Selenium IDE should
be able to highlight the orange box as shown below.

From <https://www.guru99.com/locators-in-selenium-ide.html>
Summary
Syntax for
Locator Usage
|
Method |
Target Syntax |
Example |
|
By
ID |
id= id_of_the_element |
id=email |
|
By Name |
name=name_of_the_element |
name=userName |
|
By
Name Using Filters |
name=name_of_the_element filter=value_of_filter |
name=tripType
value=oneway |
|
By Link Text |
link=link_text |
link=REGISTER |
|
Tag
and ID |
css=tag#id |
css=input#email |
|
Tag and Class |
css=tag.class |
css=input.inputtext |
|
Tag
and Attribute |
css=tag[attribute=value] |
css=input[name=lastName] |
|
Tag, Class, and Attribute |
css=tag.class[attribute=value] |
css=input.inputtext[tabindex=1] |
From <https://www.guru99.com/locators-in-selenium-ide.html>
Monday, March 15, 2021
3:51 PM
WebElement
loginLink = driver.findElement(By.linkText("Login"));
FindElements
command syntax:
FindElements
in Selenium command takes in By object as the parameter and returns a list of
web elements. It returns an empty list if there are no elements found using the
given locator strategy and locator value. Below is the syntax of find elements
command.
List<WebElement>
elementName =
driver.findElements(By.LocatorStrategy("LocatorValue"));
Example:
List<WebElement>
listOfElements = driver.findElements(By.xpath("//div"));
Find
element Vs Find elements
Below
are the major differences between find element and find elements commands.

Find
element Vs Find elements in Selenium
|
Find
Element |
Find
Elements |
|
Returns
the first most web element if there are multiple web elements found with the
same locator |
Returns
a list of web elements |
|
Throws
exception NoSuchElementException if there are no elements matching the
locator strategy |
Returns
an empty list if there are no web elements matching the locator strategy |
|
Find
element by XPath will only find one web element |
It
will find a collection of elements whose match the locator strategy. |
|
Not
Applicable |
Each
Web element is indexed with a number starting from 0 just like an array |
From <https://www.guru99.com/find-element-selenium.html>
package
com.sample.stepdefinitions;
import
java.util.List;
import
org.openqa.selenium.By;
import org.openqa.selenium.WebDriver;
import org.openqa.selenium.WebElement;
import org.openqa.selenium.chrome.ChromeDriver;
public class
NameDemo {
public static
void main(String[] args) {
System.setProperty("webdriver.chrome.driver",
"X://chromedriver.exe");
WebDriver driver = new
ChromeDriver();
driver.get("http://demo.guru99.com/test/ajax.html");
List<WebElement> elements =
driver.findElements(By.name("name"));
System.out.println("Number of
elements:" +elements.size());
for (int i=0;
i<elements.size();i++){
System.out.println("Radio
button text:" + elements.get(i).getAttribute("value"));
}
}
}
From <https://www.guru99.com/find-element-selenium.html>
List of web elements
Monday, March 15, 2021
3:53 PM
package
com.sample.stepdefinitions;
import
java.util.List;
import
org.openqa.selenium.By;
import org.openqa.selenium.WebDriver;
import org.openqa.selenium.WebElement;
import org.openqa.selenium.chrome.ChromeDriver;
public class
NameDemo {
public static
void main(String[] args) {
System.setProperty("webdriver.chrome.driver",
"X://chromedriver.exe");
WebDriver driver = new
ChromeDriver();
driver.get("http://demo.guru99.com/test/ajax.html");
List<WebElement> elements =
driver.findElements(By.name("name"));
System.out.println("Number of
elements:" +elements.size());
for (int i=0;
i<elements.size();i++){
System.out.println("Radio
button text:" + elements.get(i).getAttribute("value"));
}
}
}
From <https://www.guru99.com/find-element-selenium.html>
Monday, March 15, 2021
3:54 PM
Buttons
The
Selenium click button can be accessed using the click() method.
In
the example above
1.
Find the button to Sign in
2.
Click on the "Sign-in" Button in the
login page of the site to login to the site.

Submit
Buttons
Submit
buttons are used to submit the entire form to the server. We can either use the
click () method on the web element like a normal button as we have done above
or use the submit () method on any web element in the form or on the submit
button itself.

When
submit() is used, WebDriver will look up the DOM to know which form the element
belongs to, and then trigger its submit function.
Complete
Code
Here
is the complete working code
import
org.openqa.selenium.By;
import org.openqa.selenium.WebDriver;
import
org.openqa.selenium.chrome.ChromeDriver;
import
org.openqa.selenium.*;
public class
Form
{
public static void main(String[]
args) {
// declaration and
instantiation of
objects/variables
System.setProperty("webdriver.chrome.driver","G:\\chromedriver.exe");
WebDriver driver = new
ChromeDriver();
String baseUrl = "http://demo.guru99.com/test/login.html";
driver.get(baseUrl);
// Get the
WebElement corresponding to the Email
Address(TextField)
WebElement email = driver.findElement(By.id("email"));
// Get the
WebElement corresponding to the Password
Field
WebElement password =
driver.findElement(By.name("passwd"));
email.sendKeys("abcd@gmail.com");
password.sendKeys("abcdefghlkjl");
System.out.println("Text
Field
Set");
// Deleting values in the text
box
email.clear();
password.clear();
System.out.println("Text
Field
Cleared");
// Find the
submit
button
WebElement login =
driver.findElement(By.id("SubmitLogin"));
// Using click method to submit
form
email.sendKeys("abcd@gmail.com");
password.sendKeys("abcdefghlkjl");
login.click();
System.out.println("Login
Done with
Click");
//using submit method to submit
the form. Submit used on password field
driver.get(baseUrl);
driver.findElement(By.id("email")).sendKeys("abcd@gmail.com");
driver.findElement(By.name("passwd")).sendKeys("abcdefghlkjl");
driver.findElement(By.id("SubmitLogin")).submit();
System.out.println("Login
Done with
Submit");
//driver.close();
}
}
From <https://www.guru99.com/accessing-forms-in-webdriver.html>
Monday, March 15, 2021
3:56 PM
Radio
Button
Radio
Buttons too can be toggled on by using the click() method.
Using http://demo.guru99.com/test/radio.html for practise, see that
radio1.click() toggles on the "Option1" radio button. radio2.click()
toggles on the "Option2" radio button leaving the "Option1"
unselected.

Check
Box
Toggling
a check box on/off is also done using the click() method.
The
code below will click on Facebook's "Keep me logged in" check box
twice and then output the result as TRUE when it is toggled on, and FALSE if it
is toggled off.
From <https://www.guru99.com/checkbox-and-radio-button-webdriver.html>

isSelected()
method is used to know whether the Checkbox is toggled on or off.
Here
is another example: http://demo.guru99.com/test/radio.html

Complete
Code
Here
is the complete working code
import
org.openqa.selenium.By;
import org.openqa.selenium.WebDriver;
import
org.openqa.selenium.chrome.ChromeDriver;
import
org.openqa.selenium.*;
public class
Form
{
public static void main(String[]
args) {
// declaration and
instantiation of
objects/variables
System.setProperty("webdriver.chrome.driver","G:\\chromedriver.exe");
WebDriver driver = new
ChromeDriver();
driver.get("http://demo.guru99.com/test/radio.html");
WebElement radio1 =
driver.findElement(By.id("vfb-7-1"));
WebElement radio2 =
driver.findElement(By.id("vfb-7-2"));
//Radio Button1 is
selected
radio1.click();
System.out.println("Radio
Button Option 1
Selected");
//Radio Button1 is de-selected
and Radio Button2 is
selected
radio2.click();
System.out.println("Radio
Button Option 2
Selected");
// Selecting
CheckBox
WebElement option1 =
driver.findElement(By.id("vfb-6-0"));
// This will
Toggle the Check box
option1.click();
// Check whether
the Check box is toggled on
if (option1.isSelected())
{
System.out.println("Checkbox is Toggled
On");
} else
{
System.out.println("Checkbox is Toggled
Off");
}
//Selecting Checkbox and using
isSelected Method
driver.get("http://demo.guru99.com/test/facebook.html");
WebElement chkFBPersist =
driver.findElement(By.id("persist_box"));
for (int i=0; i<2; i++)
{
chkFBPersist.click ();
System.out.println("Facebook Persists Checkbox Status is - "+chkFBPersist.isSelected());
}
//driver.close();
}
}
Troubleshooting
If
you encounter NoSuchElementException() while finding elements, it means that
the element is not found in the page at the point the Web driver accessed the
page.
1.
Check your locator again using Firepath or
Inspect Element in Chrome.
2.
Check whether the value you used in the code is
different from the one for the element in Firepath now.
3.
Some properties are dynamic for few elements.
In case, you find that the value is different and is changing dynamically,
consider using By.xpath() or By.cssSelector() which are more reliable but
complex ways.
4.
Sometimes, it could be a wait issue too i.e.,
the Web driver executed your code even before the page loaded completely, etc.
5.
Add a wait before findElement() using implicit
or explicit waits.
Summary
- The table below summarizes the commands to access each
type of element discussed above
|
Element |
Command |
Description |
|
Check
Box, Radio Button |
click() |
used
to toggle the element on/off |
From <https://www.guru99.com/checkbox-and-radio-button-webdriver.html>
Monday, March 15, 2021
4:00 PM
isSelected() method
is used to know whether the Checkbox is toggled on or off.
From <https://www.guru99.com/checkbox-and-radio-button-webdriver.html>
Monday, March 15, 2021
4:06 PM
Accessing
Image Links
Image
links are the links in web pages represented by an image which when clicked
navigates to a different window or page.
Since
they are images, we cannot use the By.linkText() and By.partialLinkText()
methods because image links basically have no link texts at all.
In
this case, we should resort to using either By.cssSelector or By.xpath. The
first method is more preferred because of its simplicity.
From <https://www.guru99.com/click-on-image-in-selenium.html>
package
newproject;
import
org.openqa.selenium.By;
import
org.openqa.selenium.WebDriver;
import
org.openqa.selenium.chrome.ChromeDriver;
public class
MyClass
{
public static void main(String[]
args)
{
String baseUrl = "https://www.facebook.com/login/identify?ctx=recover";
System.setProperty("webdriver.chrome.driver","G:\\chromedriver.exe");
WebDriver driver = new
ChromeDriver();
driver.get(baseUrl);
//click on the
"Facebook" logo on the upper left
portion
driver.findElement(By.cssSelector("a[title=\"Go
to Facebook
home\"]")).click();
//verify that we
are now back on Facebook's
homepage
if
(driver.getTitle().equals("Facebook - log in or sign up"))
{
System.out.println("We
are back at Facebook's
homepage");
} else
{
System.out.println("We
are NOT in Facebook's
homepage");
}
driver.close();
}
}
Result
.png)
Conclusion:
This
is all to clicking images. Accessing image link is done using By.cssSelector()
From <https://www.guru99.com/click-on-image-in-selenium.html>
DropDown
Monday, March 15, 2021
4:08 PM
How to Select
Value from DropDown using Selenium Webdriver
In this tutorial,
we will learn how to handle DropDown in Selenium and Multiple Select
Operations.
Select Class in
Selenium
The Select
Class in Selenium is a method used to implement the HTML SELECT tag.
The html select tag provides helper methods to select and deselect the
elements. The Select class is an ordinary class so New keyword is used to
create its object and it specifies the web element location.
Select Option from
Drop-Down Box
Following is a
step by step process on how to select value from dropdown in Selenium:
Before handling
dropdown in Selenium and controlling drop-down boxes, we must do following two
things:
1.
Import the package org.openqa.selenium.support.ui.Select
2.
Instantiate the drop-down box as an object, Select in Selenium
WebDriver
As an example, go
to Mercury Tours' Registration page (http://demo.guru99.com/test/newtours/register.php) and notice the "Country" drop-down box
there.
From <https://www.guru99.com/select-option-dropdown-selenium-webdriver.html>
Step
1
Import
the "Select" package.
![]()
Step
2
Declare
the drop-down element as an instance of the Select class. In the example below,
we named this instance as "drpCountry".
![]()
Step
3
We
can now start controlling "drpCountry" by using any of the available
Select methods to select dropdown in Selenium. The sample code below will
select the option "ANTARCTICA."
.png)
Selecting
Items in a Multiple SELECT elements
We
can also use the selectByVisibleText() method in selecting
multiple options in a multi SELECT element. As an example, we will take http://jsbin.com/osebed/2 as the base URL. It contains a
drop-down box that allows multiple selections at a time.
From <https://www.guru99.com/select-option-dropdown-selenium-webdriver.html>
.png)
The
code below will select the first two options using the selectByVisibleText()
method.
.png)
Select
Methods
The
following are the most common methods used on Selenium dropdown list.
|
Method |
Description |
|
selectByVisibleText() and deselectByVisibleText() Example:
|
|
|
selectByValue() and deselectByValue() Example:
|
|
|
selectByIndex() and deselectByIndex() Example:
|
|
|
isMultiple() Example:
|
|
|
deselectAll() Example:
|
|
.png)
Here
is the complete code
package
newpackage;
import org.openqa.selenium.WebDriver;
import org.openqa.selenium.firefox.FirefoxDriver;
import org.openqa.selenium.support.ui.Select;
import org.openqa.selenium.By;
public class
accessDropDown {
public static void main(String[] args) {
System.setProperty("webdriver.gecko.driver","C:\\geckodriver.exe");
String baseURL = "http://demo.guru99.com/test/newtours/register.php";
WebDriver driver = new FirefoxDriver();
driver.get(baseURL);
Select
drpCountry = new Select(driver.findElement(By.name("country")));
drpCountry.selectByVisibleText("ANTARCTICA");
//Selecting
Items in a Multiple SELECT elements
driver.get("http://jsbin.com/osebed/2");
Select
fruits = new Select(driver.findElement(By.id("fruits")));
fruits.selectByVisibleText("Banana");
fruits.selectByIndex(1);
}
}
Summary
|
Element |
Command |
Description |
|
Drop-Down
Box |
selectByVisibleText()/ deselectByVisibleText() |
selects/deselects
an option by its displayed text |
|
|
selectByValue()/ deselectByValue() |
selects/deselects
an option by the value of its "value" attribute |
|
|
selectByIndex()/ deselectByIndex() |
selects/deselects
an option by its index |
|
|
isMultiple() |
returns
TRUE if the drop-down element allows multiple selection at a time; FALSE if
otherwise |
|
|
deselectAll() |
deselects
all previously selected options |
To
control drop-down boxes, you must first import the org.openqa.selenium.support.ui.Select
package and then create a Select instance.
From <https://www.guru99.com/select-option-dropdown-selenium-webdriver.html>
Monday, March 15, 2021
4:12 PM
What is Link Text
in Selenium?
A Link
Text in Selenium is used to identify the hyperlinks on a web page. It
is determined with the help of an anchor tag. For creating the hyperlinks on a
web page, we can use an anchor tag followed by the link Text.
Links
Matching a Criterion
Links
can be accessed using an exact or partial match of their link text. The
examples below provide scenarios where multiple matches would exist and would
explain how WebDriver would deal with them.
In
this tutorial, we will learn the available methods to find and access the Links
using Webdriver. Also, we will discuss some of the common problems faced while
accessing Links and will further discuss on how to resolve them.
Here
is what you will learn-
- Accessing links using Exact Text Match: By.linkText()
- Accessing links using Partial Text Match:
By.partialLinkText()
- How to get Multiple links with the same Link Text
- Case-sensitivity for Link Text
- Links Outside and Inside a Block
Accessing
links using Exact Text Match: By.linkText()
Accessing
links using their exact link text is done through the By.linkText() method.
However, if there are two links that have the very same link text, this method
will only access the first one. Consider the HTML code below
From <https://www.guru99.com/locate-by-link-text-partial-link-text.html>

.png)
When
you try to run the WebDriver code below, you will be accessing the first
"click here" link
.png)
Code:
import
org.openqa.selenium.By;
import
org.openqa.selenium.WebDriver;
import org.openqa.selenium.chrome.ChromeDriver;
public class
MyClass
{
public static void main(String[]
args)
{
String baseUrl = "http://demo.guru99.com/test/link.html";
System.setProperty("webdriver.chrome.driver","G:\\chromedriver.exe");
WebDriver driver = new
ChromeDriver();
driver.get(baseUrl);
driver.findElement(By.linkText("click here")).click();
System.out.println("title of
page is: " +
driver.getTitle());
driver.quit();
}
}
Here
is how it works-

As
a result, you will automatically be taken to Google.
.png)
Accessing
links using Partial Text Match: By.partialLinkText()
Accessing
links using a portion of their link text is done using the By.partialLinkText() method.
If you specify a partial link text that has multiple matches, only the first
match will be accessed. Consider the HTML code below.
.png)
.png)
When
you execute the WebDriver code below, you will still be taken to Google.
.png)
Code:
import
org.openqa.selenium.By;
import
org.openqa.selenium.WebDriver;
import
org.openqa.selenium.chrome.ChromeDriver;
public class P1
{
public static void main(String[]
args)
{
String baseUrl = "http://demo.guru99.com/test/accessing-link.html";
System.setProperty("webdriver.chrome.driver","G:\\chromedriver.exe");
WebDriver driver = new
ChromeDriver();
driver.get(baseUrl);
driver.findElement(By.partialLinkText("here")).click();
System.out.println("Title of
page is: " +
driver.getTitle());
driver.quit();
}
}
.png)
How
to get Multiple links with the same Link Text
So,
how to get around the above problem? In cases where there are multiple links
with the same link text, and we want to access the links other than the first
one, how do we go about it?
In
such cases, generally, different locators viz... By.xpath(), By.cssSelector()
or By.tagName() are used.
Most
commonly used is By.xpath(). It is the most reliable one but it looks complex
and non-readable too.
Case-sensitivity
for Link Text

The
parameters for By.linkText() and By.partialLinkText() are
both case-sensitive, meaning that capitalization matters. For example, in
Mercury Tours' homepage, there are two links that contain the text
"egis" - one is the "REGISTER" link found at the top menu,
and the other is the "Register here" link found at the lower right
portion of the page.
.png)
Though
both links contain the character sequence "egis," one is the
"By.partialLinkText()" method will access these two links separately
depending on the capitalization of the characters. See the sample code below.
.png)
Code
public static
void main(String[] args)
{
String baseUrl = "http://demo.guru99.com/test/newtours/";
System.setProperty("webdriver.chrome.driver","G:\\chromedriver.exe");
WebDriver driver = new
ChromeDriver();
driver.get(baseUrl);
String theLinkText =
driver.findElement(By
.partialLinkText("egis"))
.getText();
System.out.println(theLinkText);
theLinkText =
driver.findElement(By
.partialLinkText("EGIS"))
.getText();
System.out.println(theLinkText);
driver.quit();
}
Links
Outside and Inside a Block
The
latest HTML5 standard allows the <a> tags to be placed inside and outside
of block-level tags like <div>, <p>, or <h3>. The
"By.linkText()" and "By.partialLinkText()" methods can
access a link located outside and inside these block-level elements. Consider
the HTML code below.
.png)
.png)
The
WebDriver code below accesses both of these links using By.partialLinkText()
method.
.png)
Code:
import
org.openqa.selenium.By;
import
org.openqa.selenium.WebDriver;
import
org.openqa.selenium.chrome.ChromeDriver;
public class
MyClass
{
public static void main(String[]
args)
{
String baseUrl = "http://demo.guru99.com/test/block.html";
System.setProperty("webdriver.chrome.driver","G:\\chromedriver.exe");
WebDriver driver = new ChromeDriver();
driver.get(baseUrl);
driver.findElement(By.partialLinkText("Inside")).click();
System.out.println(driver.getTitle());
driver.navigate().back();
driver.findElement(By.partialLinkText("Outside")).click();
System.out.println(driver.getTitle());
driver.quit();
}
}
The
output above confirms that both links were accessed successfully because their
respective page titles were retrieved correctly.
Summary
- Links are accessed using the click() method.
- Apart from the locators available for any WebElement,
Links also have link text based locators:
- By.linkText() – locates the links based on the exact
match of the link's text provided as a parameter.
- By.partialLinkText() – locates links based on the
partial text match of the link's text.
- Both the above locators are case Sensitive.
- If there are multiple matches, By.linkText() and
By.partialLinkText() will only select the first match. In such cases where
multiple links with the same link text are present, other locators based
on xpath, CSS are used.
- findElements() & By.tagName("a") method
finds all the elements in the page matching the locator criteria
- Links can be accessed by the By.linkText() and
By.partialLinkText() whether they are inside or outside block-level
elements.
From <https://www.guru99.com/locate-by-link-text-partial-link-text.html>
Monday, March 15, 2021
6:23 PM
Action Class in
Selenium
Action Class in
Selenium is a built-in feature provided by the selenium for
handling keyboard and mouse events. It includes various operations such as
multiple events clicking by control key, drag and drop events and many more.
These operations from the action class are performed using the advanced user
interaction API in Selenium Webdriver.
Handling
Keyboard & Mouse Events
Handling
special keyboard and mouse events are done using the Advanced User
Interactions API. It contains the Actions and the Action classes
that are needed when executing these events. The following are the most
commonly used keyboard and mouse events provided by the Actions class.
|
Method |
Description |
|
clickAndHold() |
Clicks
(without releasing) at the current mouse location. |
|
contextClick() |
Performs
a context-click at the current mouse location. (Right Click Mouse Action) |
|
doubleClick() |
Performs
a double-click at the current mouse location. |
|
dragAndDrop(source,
target) |
Performs
click-and-hold at the location of the source element, moves to the location
of the target element, then releases the mouse. Parameters: source-
element to emulate button down at. target-
element to move to and release the mouse at. |
|
dragAndDropBy(source,
x-offset, y-offset) |
Performs
click-and-hold at the location of the source element, moves by a given
offset, then releases the mouse. Parameters: source-
element to emulate button down at. xOffset-
horizontal move offset. yOffset-
vertical move offset. |
|
keyDown(modifier_key) |
Performs
a modifier key press. Does not release the modifier key - subsequent
interactions may assume it's kept pressed. Parameters: modifier_key
- any of the modifier keys (Keys.ALT, Keys.SHIFT, or Keys.CONTROL) |
|
keyUp(modifier
_key) |
Performs
a key release. Parameters: modifier_key
- any of the modifier keys (Keys.ALT, Keys.SHIFT, or Keys.CONTROL) |
|
moveByOffset(x-offset,
y-offset) |
Moves
the mouse from its current position (or 0,0) by the given offset. Parameters: x-offset-
horizontal offset. A negative value means moving the mouse left. y-offset-
vertical offset. A negative value means moving the mouse down. |
|
moveToElement(toElement) |
Moves
the mouse to the middle of the element. Parameters: toElement-
element to move to. |
|
release() |
Releases
the depressed left mouse button at the current mouse location |
|
sendKeys(onElement,
charsequence) |
Sends
a series of keystrokes onto the element. Parameters: onElement
- element that will receive the keystrokes, usually a text field charsequence
- any string value representing the sequence of keystrokes to be sent |
In
the following example, we shall use the moveToElement() method to mouse-over on
one Mercury Tours' table rows. See the example below.
From <https://www.guru99.com/keyboard-mouse-events-files-webdriver.html>
The
cell shown above is a portion of a <TR> element. If not hovered, its
color is #FFC455 (orange). After hovering, the cell's color becomes
transparent. It becomes the same color as the blue background of the whole
orange table.
Step
1: Import the Actions and Action classes.
![]()
Step
2: Instantiate a new Actions object.
![]()
Step
3: Instantiate an Action using the Actions object
in step 2.

In
this case, we are going to use the moveToElement() method because we are simply
going to mouse-over the "Home" link. The build() method is always the
final method used so that all the listed actions will be compiled into a single
step.
Step
4: Use the perform() method when executing the
Action object we designed in Step 3.
![]()
Below
is the whole WebDriver code to check the background color of the <TR>
element before and after the mouse-over.
package
newproject;
import
org.openqa.selenium.*;
import org.openqa.selenium.firefox.FirefoxDriver;
import org.openqa.selenium.interactions.Action;
import org.openqa.selenium.interactions.Actions;
public class PG7
{
public static void main(String[]
args) {
String baseUrl = "http://demo.guru99.com/test/newtours/";
System.setProperty("webdriver.gecko.driver","C:\\geckodriver.exe");
WebDriver driver = new
FirefoxDriver();
driver.get(baseUrl);
WebElement link_Home =
driver.findElement(By.linkText("Home"));
WebElement td_Home =
driver
.findElement(By
.xpath("//html/body/div"
+
"/table/tbody/tr/td"
+
"/table/tbody/tr/td"
+
"/table/tbody/tr/td"
+
"/table/tbody/tr"));
Actions builder = new
Actions(driver);
Action mouseOverHome =
builder
.moveToElement(link_Home)
.build();
String bgColor =
td_Home.getCssValue("background-color");
System.out.println("Before hover: " + bgColor);
mouseOverHome.perform();
bgColor =
td_Home.getCssValue("background-color");
System.out.println("After hover: " + bgColor);
driver.close();
}
}
The
output below clearly states that the background color became transparent after
the mouse-over.

Building
a Series of Multiple Actions
You
can build a series of actions using the Action and Actions classes.
Just remember to close the series with the build() method. Consider the sample
code below.

public static
void main(String[] args) {
String baseUrl = "http://www.facebook.com/";
WebDriver driver = new FirefoxDriver();
driver.get(baseUrl);
WebElement txtUsername = driver.findElement(By.id("email"));
Actions builder
= new Actions(driver);
Action seriesOfActions = builder
.moveToElement(txtUsername)
.click()
.keyDown(txtUsername,
Keys.SHIFT)
.sendKeys(txtUsername,
"hello")
.keyUp(txtUsername, Keys.SHIFT)
.doubleClick(txtUsername)
.contextClick()
.build();
seriesOfActions.perform() ;
}

Summary
- Handling special keyboard and mouse events are done
using the AdvancedUserInteractions API.
- Frequently used Keyword and Mouse Events are
doubleClick(), keyUp, dragAndDropBy, contextClick & sendKeys.
From <https://www.guru99.com/keyboard-mouse-events-files-webdriver.html>
Monday, March 15, 2021
6:28 PM
Uploading
Files
For
this section, we will use http://demo.guru99.com/test/upload/ as our test application. This site
easily allows any visitor to upload files without requiring them to sign up.
Uploading
files in WebDriver is done by simply using the sendKeys() method on the
file-select input field to enter the path to the file to be uploaded.

Handle File upload
popup in Selenium Webdriverhandle file upload popup in selenium webdriver
Let's
say we wish to upload the file "C:\newhtml.html". Our WebDriver code
should be like the one shown below.
package
newproject;
import org.openqa.selenium.*;
import org.openqa.selenium.firefox.FirefoxDriver;
public class PG9 {
public static void main(String[]
args) {
System.setProperty("webdriver.gecko.driver","C:\\geckodriver.exe");
String baseUrl = "http://demo.guru99.com/test/upload/";
WebDriver driver = new
FirefoxDriver();
driver.get(baseUrl);
WebElement uploadElement =
driver.findElement(By.id("uploadfile_0"));
// enter the
file path onto the file-selection input field
uploadElement.sendKeys("C:\\newhtml.html");
// check the
"I accept the terms of service" check box
driver.findElement(By.id("terms")).click();
// click the
"UploadFile" button
driver.findElement(By.name("send")).click();
}
}
After
running this script, you should be able to upload the file successfully and you
should get a message similar to this.
From <https://www.guru99.com/upload-download-file-selenium-webdriver.html>
Monday, March 15, 2021
6:38 PM
Selenium Alert
& Popup Window Handling: How to Handle?
In this tutorial,
we will learn how to handle popup in Selenium and different types of alerts
found in web application Testing. We will also see how to handle Alert in Selenium
WebDriver and learn how do we accept and reject the alert depending upon the
alert types.
In this tutorial,
you will learn-
- What is
Alert?
- How to
handle Alert in Selenium WebDriver
- How to
handle Selenium Popup window using Webdriver
What is Alert in
Selenium?
An Alert
in Selenium is a small message box which appears on screen to give the
user some information or notification. It notifies the user with some specific
information or error, asks for permission to perform certain tasks and it also
provides warning messages as well.
Here are few
alert in Selenium types:
From <https://www.guru99.com/alert-popup-handling-selenium.html>
Simple
Alert
The
simple alert class in Selenium displays some information or warning on the
screen.
2)
Prompt Alert.
This
Prompt Alert asks some input from the user and Selenium webdriver can enter the
text using sendkeys(" input…. ").

3)
Confirmation Alert.
This
confirmation alert asks permission to do some type of operation.

How
to handle Alert in Selenium WebDriver
Alert
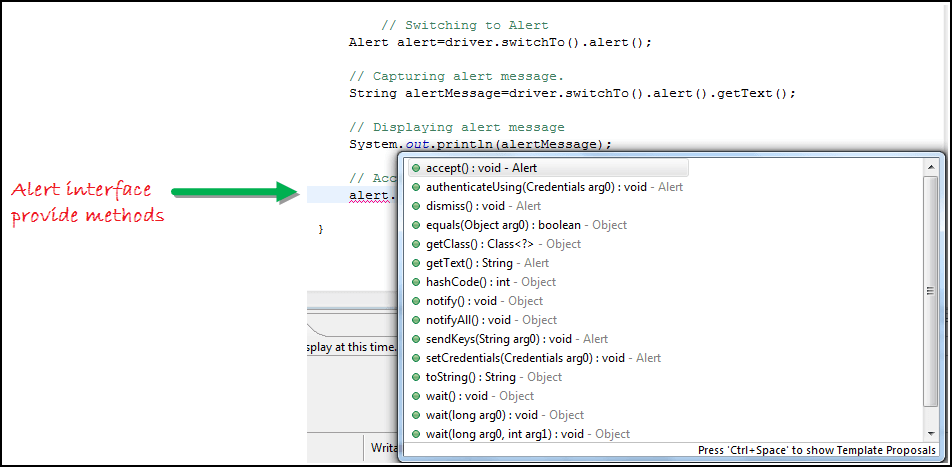
interface provides the below few methods which are widely used in Selenium Webdriver.
1)
void dismiss() // To click on the 'Cancel' button of the alert.
driver.switchTo().alert().dismiss();
2)
void accept() // To click on the 'OK' button of the alert.
driver.switchTo().alert().accept();
3)
String getText() // To capture the alert message.
driver.switchTo().alert().getText();
4)
void sendKeys(String stringToSend) // To send some data to alert box.
driver.switchTo().alert().sendKeys("Text");
You
can see a number of Alert methods are displayed as shown in below screen
suggested by Eclipse.
We
can easily switch to alert from the main window by using Selenium's .switchTo() method.
Now
we automate the given below scenario.
In
this scenario, we will use Guru99 demo site to illustrate Selenium Alert
handling.
Step
1) Launch the web browser and open the site
"http://demo.guru99.com/test/delete_customer.php "
Step
2) Enter Any Customer id.

Step
3) After entering the customer ID, Click on
the "Submit" button.
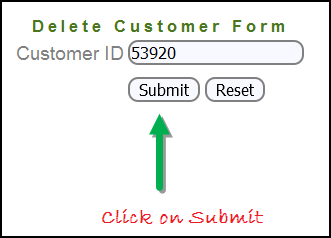
Step
4) Reject/accept the alert.

Handling
Alert in Selenium Webdriver using above scenario
import org.openqa.selenium.By;
import org.openqa.selenium.WebDriver;
import org.openqa.selenium.chrome.ChromeDriver;
import
org.openqa.selenium.NoAlertPresentException;
import org.openqa.selenium.Alert;
public class
AlertDemo {
public static void
main(String[] args) throws NoAlertPresentException,InterruptedException
{
System.setProperty("webdriver.chrome.driver","G:\\chromedriver.exe");
WebDriver
driver = new ChromeDriver();
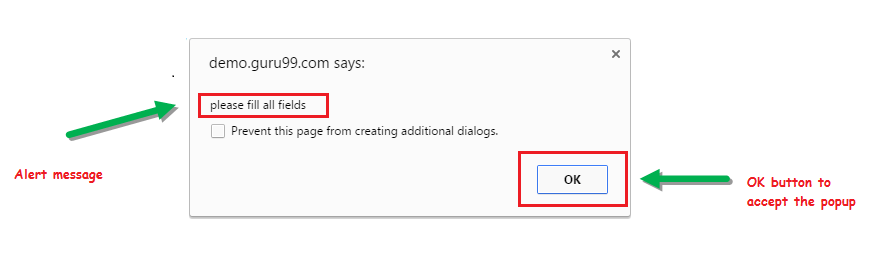
// Alert Message handling
driver.get("http://demo.guru99.com/test/delete_customer.php");
driver.findElement(By.name("cusid")).sendKeys("53920");
driver.findElement(By.name("submit")).submit();
// Switching to Alert
Alert alert =
driver.switchTo().alert();
// Capturing alert message.
String alertMessage=
driver.switchTo().alert().getText();
// Displaying alert
message
System.out.println(alertMessage);
Thread.sleep(5000);
// Accepting
alert
alert.accept();
}
}
Output
:
When
you execute the above code, it launches the site. Try to delete Customer ID by
handling confirmation alert that displays on the screen, and thereby deleting
customer id from the application.
How
to handle Selenium Pop-up window using Webdriver
In
automation, when we have multiple windows in any web application, the activity
may need to switch control among several windows from one to other in order to
complete the operation. After completion of the operation, it has to return to
the main window i.e. parent window in Selenium. We will see this further in the
article with an example.
In
Selenium web driver there are methods through which we can handle multiple
windows.
Driver.getWindowHandles();
To
handle all opened windows by web driver, we can use
"Driver.getWindowHandles()" and then we can switch window from one
window to another in a web application. Its return type is
Iterator<String>.
Driver.getWindowHandle();
When
the site opens, we need to handle the main window by driver.getWindowHandle().
This will handle the current window that uniquely identifies it within this
driver instance. Its return type is String.
For
Window handling in Selenium, we will follow the below steps:
Now,
we will automate the given below scenario to see how to handle multiple windows
using Selenium Webdriver.
In
this scenario, we will use "Guru99" demo site to illustrate window
handling.
Step
1) Launch the site.
Launch
the browser and open the site " http://demo.guru99.com/popup.php "

Step
2) Click on link "Click Here ".
When
the user clicks on the " Click Here " link, new child window opens.

Step
3) New Child Window opens.
A
new window opens, ask the user to enter email id and submit the page.

Step
4) Enter your email ID and submit.

Step
5) Display the Access Credentials on
submitting the page.

When
you execute the code, you will see the child window is open in new tab.
1.
Close the Child window on which credentials are
displayed.

1.
Switch to the parent window.

Handling
multiple windows in Selenium webdriver using above scenario.
import
java.util.Iterator;
import
java.util.Set;
import org.openqa.selenium.By;
import
org.openqa.selenium.WebDriver;
import
org.openqa.selenium.firefox.FirefoxDriver;
public class
WindowHandle_Demo
{
public static
void main(String[] args) throws InterruptedException
{
WebDriver driver=new
FirefoxDriver();
//Launching the
site.
driver.get("http://demo.guru99.com/popup.php");
driver.manage().window().maximize();
driver.findElement(By.xpath("//*[contains(@href,'popup.php')]")).click();
String
MainWindow=driver.getWindowHandle();
// To handle all new opened
window.
Set<String>
s1=driver.getWindowHandles();
Iterator<String>
i1=s1.iterator();
while(i1.hasNext())
{
String
ChildWindow=i1.next();
if(!MainWindow.equalsIgnoreCase(ChildWindow))
{
// Switching to Child
window
driver.switchTo().window(ChildWindow);
driver.findElement(By.name("emailid"))
.sendKeys("gaurav.3n@gmail.com");
driver.findElement(By.name("btnLogin")).click();
//
Closing the Child Window.
driver.close();
}
}
// Switching to Parent window i.e
Main Window.
driver.switchTo().window(MainWindow);
}
}
Output:
When
you execute the above code, it launches the site and on clicking the link
"Click here," it opens up a child window in a new tab. You can close
the child window, and switch to the parent window once the operation is
completely done. Hence handling more than one window in the application.

Multiple Window
Handling in Selenium
Conclusion:
- We defined the types of alert and shown them with a
screen shot.
- Demonstrated handling the Alert with Selenium WebDriver
using particular scenario.
- Handled multiple windows with Selenium WebDriver using
particular scenario.
From <https://www.guru99.com/alert-popup-handling-selenium.html>
Monday, March 15, 2021
7:01 PM
How to
Handle Web Table in Selenium WebDriver
Reading a
HTML Web Table
There are
times when we need to access elements (usually texts) that are within HTML
tables. However, it is very seldom for a web designer to provide an id or name
attribute to a certain cell in the table. Therefore, we cannot use the usual
methods such as "By.id()", "By.name()", or
"By.cssSelector()". In this case, the most reliable option is to
access them using the "By.xpath()" method.
In This
Tutorial, you will learn-
How to
write XPath for Table
Consider
the HTML code below.
.png)
We will use XPath to get the inner text of the cell containing the text
"fourth cell."
.png)
Step 1 -
Set the Parent Element (table)
XPath
locators in WebDriver always start with a double forward slash "//"
and then followed by the parent element. Since we are dealing with tables, the parent element should always be
the <table> tag. The first portion of our XPath locator should,
therefore, start with "//table".
![]()
Step 2 -
Add the child elements
The element
immediately under <table> is <tbody> so we can say that
<tbody> is the "child" of <table>. And also,
<table> is the "parent" of <tbody>. All child elements in
XPath are placed to the right of their parent element, separated with one
forward slash "/" like the code shown below.
.png)

Step 3 -
Add Predicates
The
<tbody> element contains two <tr> tags. We can now say that these
two <tr> tags are "children" of <tbody>. Consequently, we
can say that <tbody> is the parent of both the <tr> elements.
Another
thing we can conclude is that the two <tr> elements are siblings. Siblings
refer to child elements having the same parent.
To get to
the <td> we wish to access (the one with the text "fourth
cell"), we must first access the second <tr> and
not the first. If we simply write "//table/tbody/tr", then we will be
accessing the first <tr> tag.
So, how do
we access the second <tr> then? The answer to this is to use Predicates.
Predicates
are numbers or HTML attributes enclosed in a pair of square brackets "[
]" that distinguish a child element from its siblings. Since the <tr> we need to access
is the second one, we shall use "[2]" as the predicate.

If we won't
use any predicate, XPath will access the first sibling. Therefore, we can
access the first <tr> using either of these XPath codes.
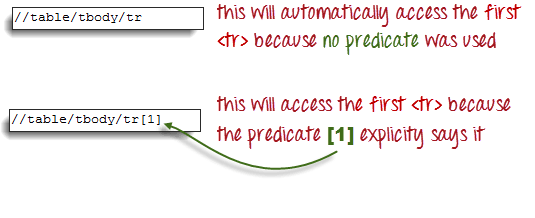
Step 4 -
Add the Succeeding Child Elements Using the Appropriate Predicates
The next
element we need to access is the second <td>. Applying the principles we
have learned from steps 2 and 3, we will finalize our XPath code to be like the
one shown below.
![]()
Now that we
have the correct XPath locator, we can already access the cell that we wanted
to and obtain its inner text using the code below. It assumes that you have
saved the HTML code above as "newhtml.html" within your C Drive.

public static void main(String[] args) {
String baseUrl = "http://demo.guru99.com/test/write-xpath-table.html";
WebDriver driver = new
FirefoxDriver();
driver.get(baseUrl);
String innerText =
driver.findElement(
By.xpath("//table/tbody/tr[2]/td[2]")).getText();
System.out.println(innerText);
driver.quit();
}
}

Accessing
Nested Tables
The same
principles discussed above applies to nested tables. Nested tables are
tables located within another table. An example is shown below.


To access
the cell with the text "4-5-6" using the "//parent/child"
and predicate concepts from the previous section, we should be able to come up
with the XPath code below.

The
WebDriver code below should be able to retrieve the inner text of the cell
which we are accessing.

public static void main(String[] args) {
String baseUrl = "http://demo.guru99.com/test/accessing-nested-table.html";
WebDriver driver = new
FirefoxDriver();
driver.get(baseUrl);
String innerText =
driver.findElement(
By.xpath("//table/tbody/tr[2]/td[2]/table/tbody/tr/td[2]")).getText();
System.out.println(innerText);
driver.quit();
}
The output
below confirms that the inner table was successfully accessed.

Using
Attributes as Predicates
If the
element is written deep within the HTML code such that the number to use for
the predicate is very difficult to determine, we can use that element's unique
attribute instead.
In the
example below, the "New York to Chicago" cell is located deep into Mercury
Tours homepage's HTML code.

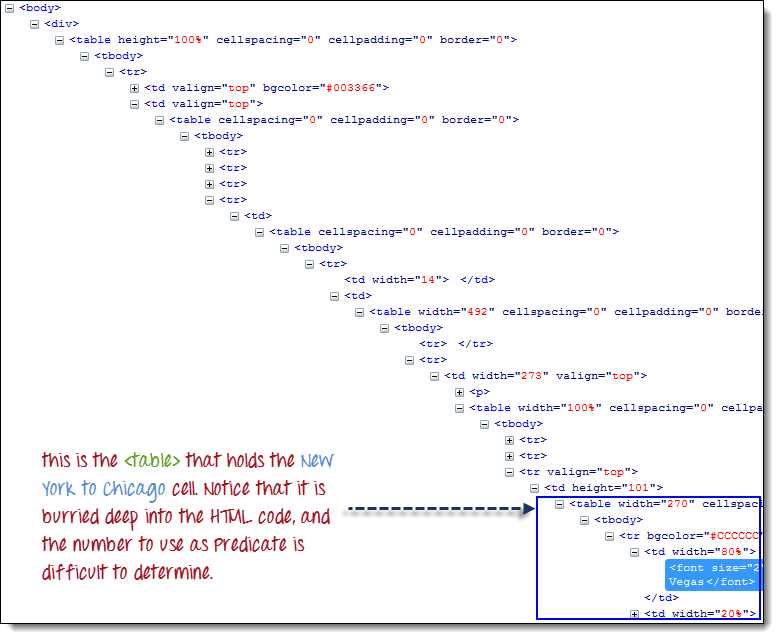
In this
case, we can use the table's unique attribute (width="270") as the
predicate. Attributes are used as predicates by prefixing them with the
@ symbol. In the example above, the "New York to Chicago" cell is
located in the first <td> of the fourth <tr>, and so our XPath
should be as shown below.
![]()
Remember
that when we put the XPath code in Java, we should use the escape character
backward slash "\" for the double quotation marks on both sides of
"270" so that the string argument of By.xpath() will not be
terminated prematurely.

We are now
ready to access that cell using the code below.

public static void main(String[] args) {
String baseUrl = "http://demo.guru99.com/test/newtours/";
WebDriver driver = new
FirefoxDriver();
driver.get(baseUrl);
String innerText =
driver.findElement(By
.xpath("//table[@width=\"270\"]/tbody/tr[4]/td"))
.getText();
System.out.println(innerText);
driver.quit();
}

Shortcut:
Use Inspect Element for Accessing Tables in Selenium
If the
number or attribute of an element is extremely difficult or impossible to
obtain, the quickest way to generate the XPath code is using Inspect Element.
Consider
the example below from Mercury Tours homepage.

Step 1
Use Firebug
to obtain the XPath code.

Step 2
Look for
the first "table" parent element and delete everything to the left of
it.

Step 3
Prefix the
remaining portion of the code with double forward slash "//" and copy
it over to your WebDriver code.

The
WebDriver code below will be able to successfully retrieve the inner text of
the element we are accessing.

public static void main(String[] args) {
String baseUrl = "http://demo.guru99.com/test/newtours/";
WebDriver driver = new
FirefoxDriver();
driver.get(baseUrl);
String innerText =
driver.findElement(By
.xpath("//table/tbody/tr/td[2]"
+
"//table/tbody/tr[4]/td/"
+
"table/tbody/tr/td[2]/"
+
"table/tbody/tr[2]/td[1]/"
+
"table[2]/tbody/tr[3]/td[2]/font"))
.getText();
System.out.println(innerText);
driver.quit();
}
Summary
- By.xpath() is commonly used to access table
elements.
- If the element is written deep within the HTML
code such that the number to use for the predicate is very difficult to
determine, we can use that element's unique attribute instead.
- Attributes are used as predicates by prefixing
them with the @ symbol.
- Use Inspect Element for Accessing Tables in
Selenium
YOU MIGHT
LIKE:
SELENIUM

Using SoapUI with Selenium for Web Service Testing
SoapUI is
the most popular open source functional Testing tool for Api Testing . It
provides...
SELENIUM

Mouse
Click & Keyboard Event: Action Class in Selenium Webdriver
In this
tutorial, we will learn handling Keyboard and Mouse Event in Selenium Webdriver
Action...
SELENIUM

Selenium Proxy Authentication using Webdriver with
EXAMPLE
What is a
Proxy? A proxy acts as an intermediary between clients sending requests and
server...
SELENIUM

UFT vs Selenium: Difference Between Selenium and HP
UFT
In this
Selenium vs UFT tutorial, we are going to compare very popular automation tools
- QTP vs...
SELENIUM

Parallel
Execution in Selenium: Session Handling & TestNG Dependency
To
understand how to run scripts in parallel, let's first understand Why do we
need Session...
SELENIUM

What is
Data Scraping using selenium? Selenium can be classified as the automation tool
that...
Selenium
Tutorials
Top
Tutorials
About
Career
Suggestion
Interesting
Execute
online
© Copyright
- Guru99 2021 Privacy
Policy | Affiliate
Disclaimer | ToS
From <https://www.guru99.com/selenium-webtable.html>
From
<https://www.guru99.com/selenium-webtable.html>
Monday, March 15, 2021
9:58 PM
Handling Dynamic
Web Tables Using Selenium WebDriver
There are two
types of HTML tables published on the web-
1.
Static tables: Data is static
i.e. Number of rows and columns are fixed.
2.
Dynamic tables: Data is dynamic
i.e. Number of rows and columns are NOT fixed.
Now, we will
learn how to handle dynamic table in Selenium:
Below is an
example of a dynamic web table in Selenium for Sales. Based on input date
filters, number of rows will get altered. So, it is dynamic in nature.

Handling static
table is easy, but handling dynamic tables in Selenium is a little bit
difficult as rows and columns are not constant.
In this tutorial,
you will learn-
- Using
X-Path to Locate Web Table Elements
- Example:
Fetch number of rows and columns from Dynamic WebTable
- Example:
Fetch cell value of a particular row and column of the Dynamic Table
- Example:
Get Maximum of all the Values in a Column of Dynamic Table
- Example:
Get all the values of a Dynamic Table
Using X-Path to
Locate Web Table Elements
Before we locate
web element, first let's understands-
From <https://www.guru99.com/handling-dynamic-selenium-webdriver.html>
What
is a web element?
Web
elements are nothing but HTML elements like textbox, dropdowns radio buttons,
submit buttons, etc. These HTML elements are written with start tag
and ends with an end tag.
For
Example,
<p> My
First HTML Document</p>.
Steps
for getting X-path of web element that we want to locate.
Step
1) In Chrome, Go to http://demo.guru99.com/test/web-table-element.php

Step
2) Right click on web element whose x-path is to
be fetched. In our case, right click on "Company" Select Inspect
option. The following screen will be shown -
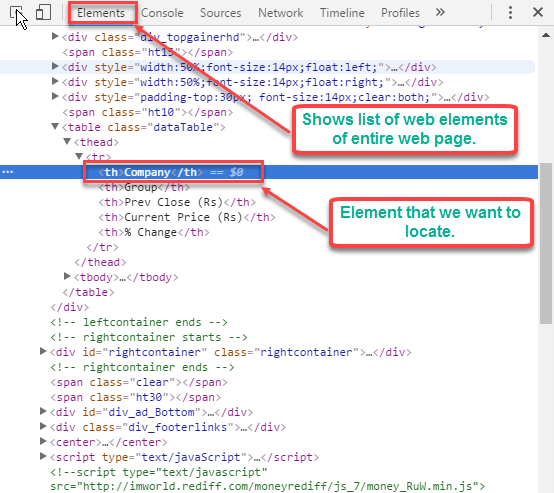
Step
3) Right Click on highlighted web element
> Select Copy -> Copy x-path option.

Step
4) Use the copied X-path
"//*[@id="leftcontainer"]/table/thead/tr/th [1]" in
Selenium WebDriver to locate the element.
Example:
Fetch number of rows and columns from Dynamic WebTable
While
dynamic web table handling in Selenium, we cannot predict its number of rows
and columns.
Using
Selenium web driver, we can find
- Number of Rows and columns of web table in Selenium
- X row or Y column's data.
Below
is program for fetching total number of rows and columns for handling web table
in Selenium:
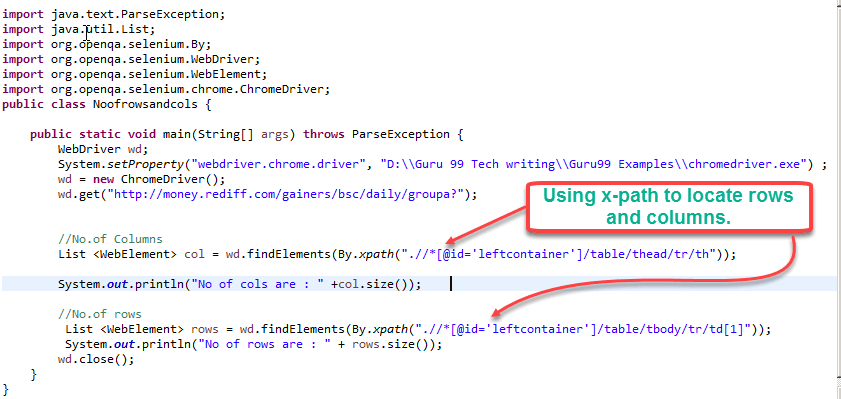
import
java.text.ParseException;
import java.util.List;
import org.openqa.selenium.By;
import org.openqa.selenium.WebDriver;
import org.openqa.selenium.WebElement;
import org.openqa.selenium.chrome.ChromeDriver;
public class
Noofrowsandcols {
public static void main(String[]
args) throws ParseException {
WebDriver wd;
System.setProperty("webdriver.chrome.driver","G://chromedriver.exe");
wd= new ChromeDriver();
wd.get("http://demo.guru99.com/test/web-table-element.php");
//No.of Columns
List col =
wd.findElements(By.xpath(".//*[@id=\"leftcontainer\"]/table/thead/tr/th"));
System.out.println("No of
cols are : " +col.size());
//No.of rows
List rows =
wd.findElements(By.xpath(".//*[@id='leftcontainer']/table/tbody/tr/td[1]"));
System.out.println("No of
rows are : " + rows.size());
wd.close();
}
}
Code
Explanation:
- Here we have first declared Web Driver object
"wd" &initialized it to chrome driver.
- We use List <WebElement> to total number of
columns in "col".
- findElements commands returns a list of ALL the elements
matching the specified locator
- using findElements and X-path
//*[@id=\"leftcontainer\"]/table/thead/tr/th we get all the
columns
- Similarly, we repeat the process for rows.
.
Output:

Example:
Fetch cell value of a particular row and column of the Dynamic Table
Let's
assume we need 3rd row of the table and its second cell's data. See the
table below-

In
above table, data is regularly updated after some span of time. The data you
try retrieve will be different from the above screenshot. However, the code
remains the same. Here is sample program to get the 3rd row and
2nd column's data.
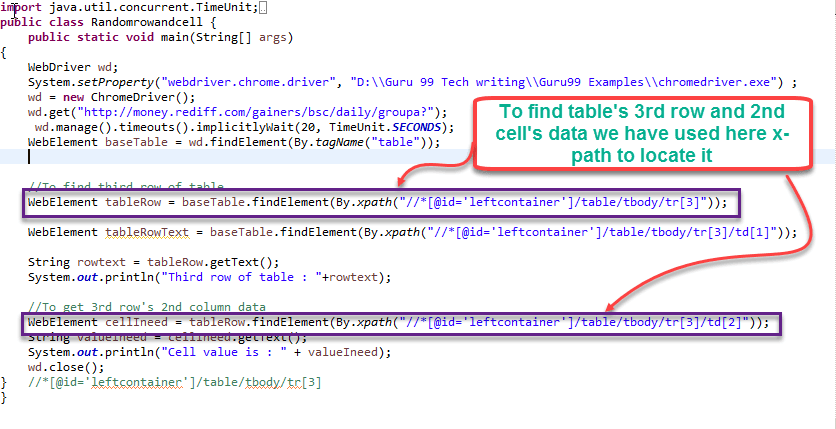
import
java.text.ParseException;
import java.util.List;
import org.openqa.selenium.By;
import org.openqa.selenium.WebDriver;
import org.openqa.selenium.WebElement;
import org.openqa.selenium.chrome.ChromeDriver;
import java.util.concurrent.TimeUnit;
public class
RowandCell {
public static void main(String[]
args) throws ParseException {
WebDriver wd;
System.setProperty("webdriver.chrome.driver","G://chromedriver.exe");
wd= new ChromeDriver();
wd.get("http://demo.guru99.com/test/web-table-element.php");
wd.manage().timeouts().implicitlyWait(20, TimeUnit.SECONDS);
WebElement baseTable = wd.findElement(By.tagName("table"));
//To find third row of table
WebElement tableRow = baseTable.findElement(By.xpath("//*[@id=\"leftcontainer\"]/table/tbody/tr[3]"));
String rowtext =
tableRow.getText();
System.out.println("Third row of table : "+rowtext);
//to get 3rd row's 2nd column data
WebElement cellIneed =
tableRow.findElement(By.xpath("//*[@id=\"leftcontainer\"]/table/tbody/tr[3]/td[2]"));
String valueIneed = cellIneed.getText();
System.out.println("Cell value is :
" + valueIneed);
wd.close();
}
}
Code
Explanation:
- Table is located using locator property
"tagname".
- Using XPath "//*[@id=\"leftcontainer\"]/table/tbody/tr[3]"
find the 3rd row and gets its text using getText () function
- Using Xpath
"//*[@id=\"leftcontainer\"]/table/tbody/tr[3]/td[2]"
find the 2nd cell in 3rd row and gets its text using getText ()
function
Output:

Example:
Get Maximum of all the Values in a Column of Dynamic Table
In
this example, we will get the maximum of all values in a particular column.
Refer
the following table -

Here
is the code

import
java.text.ParseException;
import java.util.List;
import org.openqa.selenium.By;
import org.openqa.selenium.WebDriver;
import org.openqa.selenium.WebElement;
import org.openqa.selenium.chrome.ChromeDriver;
import java.text.NumberFormat;
public class
MaxFromTable {
public static void main(String[]
args) throws ParseException {
WebDriver wd;
System.setProperty("webdriver.chrome.driver","G://chromedriver.exe");
wd= new ChromeDriver();
wd.get("http://demo.guru99.com/test/web-table-element.php");
String max;
double m=0,r=0;
//No. of Columns
List
col =
wd.findElements(By.xpath(".//*[@id='leftcontainer']/table/thead/tr/th"));
System.out.println("Total No of
columns are : " +col.size());
//No.of rows
List
rows = wd.findElements(By.xpath
(".//*[@id='leftcontainer']/table/tbody/tr/td[1]"));
System.out.println("Total No of
rows are : " + rows.size());
for (int i =1;i<rows.size();i++)
{
max=
wd.findElement(By.xpath("html/body/div[1]/div[5]/table/tbody/tr[" +
(i+1)+ "]/td[4]")).getText();
NumberFormat f
=NumberFormat.getNumberInstance();
Number num = f.parse(max);
max = num.toString();
m = Double.parseDouble(max);
if(m>r)
{
r=m;
}
}
System.out.println("Maximum
current price is : "+ r);
}
}
Code
Explanation:
- Using chrome driver we locate the web table and get
total number of row using XPath
".//*[@id='leftcontainer']/table/tbody/tr/td[1]"
- Using for loop, we iterate through total number of rows
and fetch values one by one. To get next row we use (i+1) in XPath
- We compare old value with new value and maximum value is
printed at the end of for loop
OutPut

Example:
Get all the values of a Dynamic Table
Consider
the following table http://demo.guru99.com/test/table.html

The
number of columns for each row is different.
Here
row number 1, 2 and 4 have 3 cells, and row number 3 has 2 cells, and row
number 5 has 1 cell.
We
need to get values of all the cells
Here
is the code:

import
java.text.ParseException;
import java.util.List;
import org.openqa.selenium.By;
import org.openqa.selenium.WebDriver;
import org.openqa.selenium.WebElement;
import java.util.concurrent.TimeUnit;
import org.openqa.selenium.chrome.ChromeDriver;
public class
NofRowsColmns {
public static void main(String[]
args) throws ParseException {
WebDriver wd;
System.setProperty("webdriver.chrome.driver","G://chromedriver.exe");
wd = new ChromeDriver();
wd.manage().timeouts().implicitlyWait(5,
TimeUnit.SECONDS);
wd.get("http://demo.guru99.com/test/table.html");
//To locate table.
WebElement mytable =
wd.findElement(By.xpath("/html/body/table/tbody"));
//To locate rows of
table.
List < WebElement
> rows_table = mytable.findElements(By.tagName("tr"));
//To calculate no of
rows In table.
int rows_count =
rows_table.size();
//Loop will execute till
the last row of table.
for (int row = 0; row
< rows_count; row++) {
//To locate columns(cells) of that specific
row.
List < WebElement > Columns_row =
rows_table.get(row).findElements(By.tagName("td"));
//To calculate no of columns (cells). In
that specific row.
int columns_count = Columns_row.size();
System.out.println("Number of cells In
Row " + row + " are " + columns_count);
//Loop will execute till the last cell of
that specific row.
for (int column = 0; column <
columns_count; column++) {
// To retrieve text from that specific
cell.
String celtext =
Columns_row.get(column).getText();
System.out.println("Cell Value of
row number " + row + " and column number " + column + " Is
" + celtext);
}
System.out.println("--------------------------------------------------
");
}
}
}
Code
Explanation:
- rows_count gives the total number of rows
- for each row we get the total number of columns using
rows_table.get(row).findElements(By.tagName("td"));
- We iterate through each column and of each row and fetch
values.
Output:

Summary
- By.xpath() is commonly used to access table elements.
- Static web tables in Selenium are consistent in nature.
i.e. they do have fixed number of rows as well as Cell data.
- Dynamic web tables are inconsistent i.e. they do not
have fixed number of rows and cells data.
- Using selenium web driver, we can handle dynamic web
tables easily.
- Selenium Webdriver allows us to access dynamic web
tables by their X-path
From <https://www.guru99.com/handling-dynamic-selenium-webdriver.html>
Monday, March 15, 2021
10:01 PM
Desired Capabilities in Selenium
WebDriver
Desired Capabilities
Desired Capabilities is a class in Selenium used to set
properties of browsers to perform cross browser testing of web applications. It
stores the capabilities as key-value pairs and these capabilities are used to
set browser properties like browser name, browser version, path of browser
driver in the system, etc. to determine the behaviour of browser at run time.
- Desired capability can also be used to configure
the driver instance of Selenium WebDriver.
- We can configure driver instance like
FirefoxDriver, ChromeDriver, InternetExplorerDriver by using desired
capabilities.
In this tutorial, you will learn-
- What is Desired Capability?
- Why do we need Desired Capabilities?
- Different types of Desired Capabilities Methods
- Example for set capability method
Why do we need Desired Capabilities?
Desired Capabilities are needed because every Testing scenario should be executed on some specific testing
environment. The testing environment can be a web browser, Mobile device, mobile emulator, mobile simulator, etc. The
Desired Capabilities Class helps us to tell the webdriver, which environment we
are going to use in our test script.
What is Integration Testing Software Testing Tutorial
The setCapability method of
the DesiredCapabilities Class, which is explained in the later part of the
tutorial, can be used in Selenium Grid. It is used to perform a parallel
execution on different machine configurations.
Ex: Grid

It is used to set the browser properties
(Ex. Chrome, IE), Platform Name (Ex. Linux, Windows) that are used while
executing the test cases.
In the case of mobile automation, as we
perform the tests on different varieties of mobile devices, the Mobile Platform
(ex. iOS, Android) Platform Version (Ex. 3.x,4.x in Android) can be set.

The above emulator example shows the
platform set which is android and the platform version set which is IceCream
Sandwich (4.x).
Desired Capabilities are more useful in
cases like:
- In mobile application automation, where the
browser properties and the device properties can be set.
- In Selenium grid when we want to run the test
cases on a different browser with different operating systems and
versions.
Different types of Desired Capabilities
Methods
Here we will see a different type of
desired capabilities methods and see how to use one of this method "setCapability
Method".
- getBrowserName()
public java.lang.String getBrowserName()
- setBrowserName()
public void setBrowserName(java.lang.String
browserName)
- getVersion()
public java.lang.String getVersion()
- setVersion()
public void setVersion(java.lang.String version)
- getPlatform()
public Platform getPlatform()
- setPlatform()
public Platform setPlatform()
- getCapability Method
The getCapability method of the
DesiredCapabilities class can be used to get the capability that is in use
currently in the system.
public java.lang.Object getCapability(java.lang.String
capabilityName)
- setCapability() Method
The setCapability() method of
the Desired Capabilities class is used to set the property of a test
environment like device name, OS name and version, browser name and version,
absolute path of the app under test (the .apk file of the Android app under
test), app Activity (in Android) and appPackage(in Java).
"setCapability method" in Java has the below declarations:
setCapability : public void
setCapability(java.lang.String capabilityName,boolean value)
setCapability
:public void setCapability(java.lang.String
capabilityName,java.lang.String value)
setCapability
:public void setCapability(java.lang.String capabilityName,Platform
value)
setCapability
:public void setCapability(java.lang.String key,java.lang.Object value)
Example for set capability method
Let us consider an example where we want
to run our Test
Case on Internet explorer browser to open www.gmail.com website using Selenium Webdriver.
Following is the code.
import org.openqa.selenium.WebDriver;
import org.openqa.selenium.ie.InternetExplorerDriver;
public class IEtestforDesiredCapabilities {
public static void main(String[] args) {
WebDriver driver = new InternetExplorerDriver();
driver.manage().window().maximize();
driver.get("http://gmail.com");
driver.quit();
}
}
Now run this code from Eclipse and check
out the console.
Output:
It will throw the following error when
above code is executed. The error occurs because the path to the browser driver
(IE in the above case) is not set.The browser could not be located by the
selenium code.
The path to the driver executable must
be set by the webdriver.ie.driver system property; formore information, see http://code.google.com/p/selenium/wiki/InternetExplorerDriver.
The latest version can be downloaded from http://code.google.com/p/selenium/downloads/list
Dec 11, 201212:59:43PM
org.openqa.selenium.ie.InternetExplorerDriverServer initializeLib
WARNING: This method of starting the IE
driver is deprecated and will be removed in selenium 2.26. Please download the
IEDriverServer.exe from http://code.google.com/p/selenium/downloads/list
and ensure that it is in your PATH.
Solution:
The solution for the above problem is
given in the warning section of the error itself.
- Download the Internet ExplorerDriver standalone
server for 32bit or 64bit.
- Save the driver in a suitable location in the
system.
- Set the path for the driver using the System.setProperty method.
- It is used to set the IE driver with the
webdriver property. It helps to locate the driver executable file that is
stored in the system location.
(Ex:"C:\IEDriverLocation\IEDriver.exe")
import org.openqa.selenium.WebDriver;
import org.openqa.selenium.ie.InternetExplorerDriver;
import org.openqa.selenium.remote.DesiredCapabilities;
public class IEtestforDesiredCapabilities {
public static void main(String[] args) {
//it is used to define IE capability
DesiredCapabilities capabilities = DesiredCapabilities.internetExplorer();
capabilities.setCapability(CapabilityType.BROWSER_NAME, "IE");
capabilities.setCapability(InternetExplorerDriver.
INTRODUCE_FLAKINESS_BY_IGNORING_SECURITY_DOMAINS,true);
System.setProperty("webdriver.ie.driver",
"C:\\IEDriverServer.exe");
//it is used to initialize the IE driver
WebDriver driver = new
InternetExplorerDriver(capabilities);
driver.manage().window().maximize();
driver.get("http://gmail.com");
driver.quit();
}
}
Code Explanation:
In the code above,
- The import statements is to import the required
packages for the selenium web driver, required packages for the Internet
Explorer driver, packages for the desired capabilities.
- setCapability takes the various capabilities as
input variables which are then used by the web driver to launch the
application in the desired environment.
- setProperty is used to set the path where the
driver is located. Web Driver then locates the required driver.
- Gmail website is opened in the Internet Explorer
browser by using "get" method.
Output:
The test case on Internet explorer
browser will run successfully using Selenium Webdriver.
Conclusion
The Desired Capabilities class will help
to set an environment to define the behaviour of the browser/environment on which
the test can be executed.
It helps to launch our application in
the desired environment having the capabilities that we desire to use.
This article is contributed by Krithika
Ramkumar
Monday, March 15, 2021
10:05 PM
How to Verify
Tooltip using Selenium WebDriver
Tooltip in
Selenium
A Tooltip
in Selenium is a text that appears when a mouse hovers over an object
on a web page. The object can be a link, an image, a button, a text area, etc.
The tooltip text often gives more information about the object on which the
user hovers over the mouse cursor.
Tooltips were
traditionally implemented as a 'title' attribute to an element. The value of
this attribute was shown as a tooltip on mouse-hover. This is a static text
giving information of the element with no styling.
Now, there are
many plugins available for 'tool tips' implementation. Advanced tooltips with
styling, rendering, images and links are being implemented using
JavaScript/JQuery plugins or using CSS Tooltips.
- For
accessing or verifying the static tooltips which are implemented using the
HTML "title" attribute, we can simply use the
getAttribute("title") method of the WebElement. The returned
value of this method (which is the tooltip text) is compared with an
expected value for verification.
- For
other forms of tooltip implementations, we will have to use the
"Advanced User Interactions API" provided by the Web Driver to
create the mouse hover effect and then retrieve the tooltip for the
element.
A Brief of the
Advanced User Interactions API:
Advanced User
Interactions API provides the API for user actions like drag and drop,
hovering, multi selecting, key press and release and other actions using
keyboard or mouse on a webpage.


Skip Ad
You can refer
this link for more details on the API.
Here, let's see
how to use a couple of classes and methods we would need to move a slider
element by an offset.
Step 1) In order to use
the API, the following packages/classes needs to be imported:
![]()
Step 2) Create an object
of "Actions" class and build the Sequence of user actions. Actions
class is used to build the sequence of user actions like moveToElement(),
dragAndDrop() etc. Various methods related to user actions are provided by API.
The driver object
is provided as a parameter to its constructor.
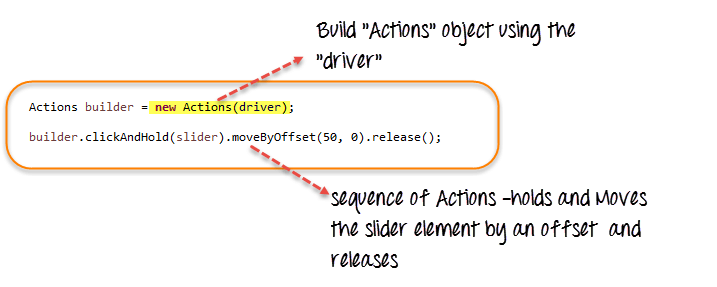
Step 3) Create an
Action Object using the build() method of "Actions" class. Call the
perform() method to execute all the actions built by the Actions object(builder
here).

We have seen how
to use some of the user Actions methods provided by the API -
clickAndHold(element), moveByOffset(10,0), release(). The API provides many
such methods.
Refer to
the link for more details.
How to get
Tooltip Text in Selenium Webdriver
Let's see the
demonstration of accessing and verifying the tool tips in the simple scenario
- Scenario
1: Tooltip is implemented using the "title" attribute
- Scenario
2: Tooltip is implemented using a jQuery plugin.
Scenario 1: HTML
'title' Attribute
For this case,
let's take the example site - http://demo.guru99.com/test/social-icon.html.
We will try to
verify the tooltip of the "github" icon at the top right of the page.
![]()
In order to do
it, we will first find the element and get its 'title' attribute and verify
with the expected tool tip text.
Since, we are
assuming the tool tip is in the "title" attribute, we are not even
automating the mouse hover effect but simply retrieving the attribute's value
using the "getAttribute()" method.

Here is the code
import
org.openqa.selenium.By;
import
org.openqa.selenium.WebDriver;
import
org.openqa.selenium.chrome.ChromeDriver;
import
org.openqa.selenium.*;
public
class ToolTip
{
public static void main(String[]
args)
{
String baseUrl = "http://demo.guru99.com/test/social-icon.html";
System.setProperty("webdriver.chrome.driver","G:\\chromedriver.exe");
WebDriver driver = new
ChromeDriver();
driver.get(baseUrl);
String expectedTooltip =
"Github";
// Find the Github icon at the
top right of the
header
WebElement github =
driver.findElement(By.xpath(".//*[@class='soc-ico
show-round']/a[4]"));
//get the value of the
"title" attribute of the github
icon
String actualTooltip =
github.getAttribute("title");
//Assert the tooltip's value is
as expected
System.out.println("Actual
Title of Tool
Tip"+actualTooltip);
if(actualTooltip.equals(expectedTooltip))
{
System.out.println("Test
Case
Passed");
}
driver.close();
}
}
Explanation of
code
1.
Find the WebElement representing the "github" icon.
2.
Get its "title" attribute using the getAttribute()
method.
3.
Assert the value against the expected tooltip value.
Scenario 2:
JQuery Plugin:
There are a
plenty of JQuery plugins available to implement the tooltips, and each one has
a slightly different form of implementation.
Some plugins
expect the tooltip HTML to be present all the time next to the element for
which the tooltip is applicable whereas the others create a dynamic
"div" tag, which appears on the fly while hovering over the element.
For our
demonstration, let's consider the "jQuery Tools Tooltip" way of
tooltip implementation.
Here in the URL
– http://demo.guru99.com/test/tooltip.html you can see the demo where on mouse hovering over
"Download now", we get an advanced tooltip with an image, callout
background, a table and a link inside it which is clickable.

If you look at
the source below, you can see that the div tag representing the tooltip is
always present next to the "Download now" link's tag. But, the code
inside the script tag below controls when it needs to popup.

Let's try to
verify just the link text in the tooltip for our demonstration here.
We will first
find the WebElement corresponding to the "Download now". Then using
the Interactions API, we will move to the element (mouse-hover). Next, we will
find the WebElement that corresponds to the link inside the displayed tooltip and
verify it against the expected text.
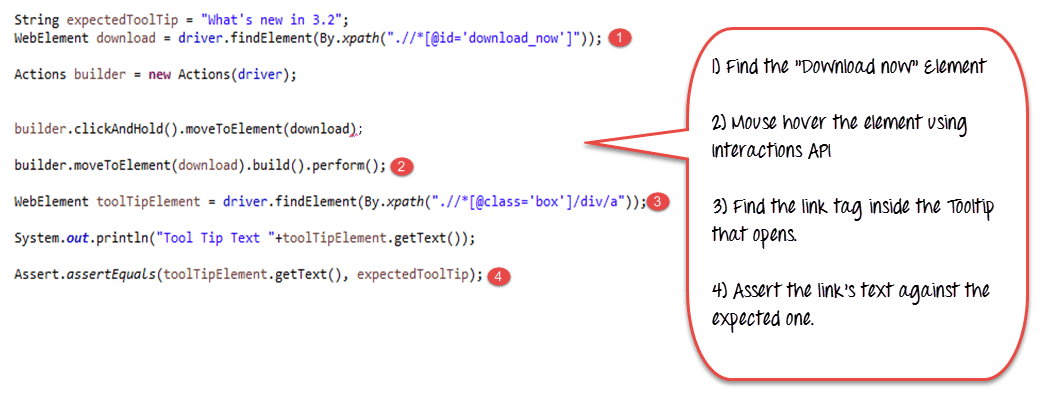
Here is the code
import
org.openqa.selenium.interactions.Action;
import
org.openqa.selenium.interactions.Actions;
import
org.openqa.selenium.By;
import
org.openqa.selenium.WebDriver;
import
org.openqa.selenium.chrome.ChromeDriver;
import org.openqa.selenium.*;
public
class JqueryToolTip
{
public static void main(String[]
args)
{
String baseUrl = "http://demo.guru99.com/test/tooltip.html";
System.setProperty("webdriver.chrome.driver","G:\\chromedriver.exe");
WebDriver driver = new
ChromeDriver();
String expectedTooltip =
"What's new in
3.2";
driver.get(baseUrl);
WebElement download =
driver.findElement(By.xpath(".//*[@id='download_now']"));
Actions builder = new Actions
(driver);
builder.clickAndHold().moveToElement(download);
builder.moveToElement(download).build().perform();
WebElement toolTipElement = driver.findElement(By.xpath(".//*[@class='box']/div/a"));
String actualTooltip =
toolTipElement.getText();
System.out.println("Actual
Title of Tool Tip
"+actualTooltip);
if(actualTooltip.equals(expectedTooltip))
{
System.out.println("Test
Case
Passed");
}
driver.close();
}
}
Code Explanation
1.
Find the WebElement that corresponds to the element
"download now" that we will mouse-hover.
2.
Using the Interactions API, mouse hover on to the "Download
now".
3.
Assuming the tooltip is displayed, find the WebElement that
corresponds to the link inside the tooltip i.e. the "a" tag.
4.
Verify the link's tooltip text retrieved using the getText()
against an expected value we have stored in "expectedToolTip"
Summary:
In this tutorial,
you have learnt how to access Tooltips using Selenium Web driver.
- Tool
Tips are implemented in different ways –
- The
basic implementation is based on HTML's "title" attribute.
getAttribute(title) gets the value of the tooltip.
- Other
tool tip implementation's like JQuery, CSS tooltips require Interactions
API to create mouse hover effect
- Advanced
User Interactions API
- moveToElement(element)
of Actions class is used to mouse hover an element.
- Build()
method of Actions class builds the sequence of user actions into an
Action object.
- Perform()
of Action class executes all the sequence of user actions at once.
- In
order to verify a tooltip, we have to first mouse-hover the element, then
find the element that corresponds to the tool tip and get its text or
other values to verify against the expected values.
Monday, March 15, 2021
10:06 PM
How to Find All/Broken links using
Selenium Webdriver
What are Broken Links?
Broken links are links or URLs that
are not reachable. They may be down or not functioning due to some server error
An URL will always have a status
with 2xx which is valid. There are different HTTP status codes which are having
different purposes. For an invalid request, HTTP status is 4xx and 5xx.
4xx class of status code is mainly
for client side error, and 5xx class of status codes is mainly for the server
response error.
We will most likely be unable to
confirm if that link is working or not until we click and confirm it.
Why should you check Broken links?
You should always make sure that
there are no broken links on the site because the user should not land into an
error page.
The error happens if the rules are
not updated correctly, or the requested resources are not existing at the
server.
Manual checking of links is a
tedious task, because each webpage may have a large number of links &
manual process has to be repeated for all pages.

11.4M
What is Integration Testing Software Testing Tutorial
An Automation script using Selenium
that will automate the process is a more apt solution.
How to check the Broken Links and
images
For checking the broken links, you
will need to do the following steps.
1.
Collect all the links in the web page based on <a> tag.
2.
Send HTTP request for the link
and read HTTP response code.
3.
Find out whether the link is valid or broken based on HTTP
response code.
4.
Repeat this for all the links captured.
Code to Find the Broken links on a
webpage
Below is the web driver code which
tests our use case:
package automationPractice;
import java.io.IOException;
import java.net.HttpURLConnection;
import java.net.MalformedURLException;
import java.net.URL;
import java.util.Iterator;
import java.util.List;
import org.openqa.selenium.By;
import org.openqa.selenium.WebDriver;
import org.openqa.selenium.WebElement;
import org.openqa.selenium.chrome.ChromeDriver;
public class BrokenLinks {
private static WebDriver driver =
null;
public static void main(String[]
args) {
// TODO Auto-generated method
stub
String homePage = "http://www.zlti.com";
String url = "";
HttpURLConnection huc = null;
int respCode = 200;
driver = new ChromeDriver();
driver.manage().window().maximize();
driver.get(homePage);
List<WebElement> links =
driver.findElements(By.tagName("a"));
Iterator<WebElement> it =
links.iterator();
while(it.hasNext()){
url = it.next().getAttribute("href");
System.out.println(url);
if(url == null ||
url.isEmpty()){
System.out.println("URL is either not configured for anchor tag or it is
empty");
continue;
}
if(!url.startsWith(homePage)){
System.out.println("URL belongs to another domain, skipping
it.");
continue;
}
try {
huc =
(HttpURLConnection)(new URL(url).openConnection());
huc.setRequestMethod("HEAD");
huc.connect();
respCode =
huc.getResponseCode();
if(respCode >= 400){
System.out.println(url+" is a broken link");
}
else{
System.out.println(url+" is a valid link");
}
} catch
(MalformedURLException e) {
// TODO Auto-generated
catch block
e.printStackTrace();
} catch (IOException e) {
// TODO Auto-generated
catch block
e.printStackTrace();
}
}
driver.quit();
}
}
Explaining the code Example
Step 1: Import Packages
Import below package in addition to
default packages:
import java.net.HttpURLConnection;
Using the methods in this package,
we can send HTTP requests and capture HTTP response codes from the response.
Step 2: Collect all links in web
page
Identify all links in a webpage and
store them in List.
List<WebElement> links =
driver.findElements(By.tagName("a"));
Obtain Iterator to traverse through
the List.
Iterator<WebElement> it =
links.iterator();
Step 3: Identifying and Validating
URL
In this part, we will check if URL
belongs to Third party domain or whether URL is empty/null.
Get href of anchor tag and store it
in url variable.
url =
it.next().getAttribute("href");
Check if URL is null or Empty and
skip the remaining steps if the condition is satisfied.
if(url == null || url.isEmpty()){
System.out.println("URL is either not configured for anchor tag or
it is empty");
continue;
}
Check whether URL belongs to a main
domain or third party. Skip the remaining steps if it belongs to third party
domain.
if(!url.startsWith(homePage)){
System.out.println("URL
belongs to another domain, skipping it.");
continue;
}
Step 4: Send http request
HttpURLConnection class has methods
to send HTTP request and capture HTTP response code. So, output of
openConnection() method (URLConnection) is type casted to HttpURLConnection.
huc = (HttpURLConnection)(new
URL(url).openConnection());
We can set Request type as
"HEAD" instead of "GET". So that only headers are returned
and not document body.
huc.setRequestMethod("HEAD");
On invoking connect() method,
actual connection to url is established and the request is sent.
huc.connect();
Step 5: Validating Links
Using getResponseCode() method we
can get response code for the request
respCode = huc.getResponseCode();
Based on response code we will try
to check link status.
if(respCode >= 400){
System.out.println(url+" is
a broken link");
}
else{
System.out.println(url+" is
a valid link");
}
Thus, we can obtain all links from
web page and print whether links are valid or broken.
Hope this tutorial helps you in
checking Broken links using selenium.
How to get ALL Links of a Web Page
One of the common procedures in web Testing is to test if all the links present within the page are
working. This can be conveniently done using a combination of the Java
for-each loop, findElements() & By.tagName("a") method.
The findElements() method, returns
a list of Web Elements with tag a. Using a for-each loop, each element is
accessed.

The WebDriver code below checks
each link from the Mercury Tours homepage to determine those that are working
and those that are still under construction.
import
org.openqa.selenium.By;
import org.openqa.selenium.WebDriver;
import
org.openqa.selenium.chrome.ChromeDriver;
import
java.util.List;
import
java.util.concurrent.TimeUnit;
import
org.openqa.selenium.*;
public class P1
{
public static void main(String[]
args)
{
String baseUrl = "http://demo.guru99.com/test/newtours/";
System.setProperty("webdriver.chrome.driver","G:\\chromedriver.exe");
WebDriver driver = new
ChromeDriver();
String underConsTitle =
"Under Construction: Mercury
Tours";
driver.manage().timeouts().implicitlyWait(5,
TimeUnit.SECONDS);
driver.get(baseUrl);
List<WebElement>
linkElements =
driver.findElements(By.tagName("a"));
String[] linkTexts = new
String[linkElements.size()];
int i
=
0;
//extract the link texts of each link
element
for
(WebElement e : linkElements)
{
linkTexts[i]
=
e.getText();
i++;
}
//test each
link
for
(String t : linkTexts)
{
driver.findElement(By.linkText(t)).click();
if
(driver.getTitle().equals(underConsTitle))
{
System.out.println("\"" + t +
"\""
+ " is under
construction.");
} else
{
System.out.println("\"" + t +
"\""
+ " is
working.");
}
driver.navigate().back();
}
driver.quit();
}
}
The output should be similar to the
one indicated below.
- Accessing
image links are done using By.cssSelector() and By.xpath() methods.
.png)
TroubleShooting
In an isolated case, the first link
accessed by the code could be the "Home" Link. In such case,
driver.navigate.back() action will show a blank page as the 1st action is
opening a browser. The driver will not be able to find all other links in a
blank browser. So IDE will throw an exception and rest of the code will not
execute. This can be easily handled using an If loop.